

In this guide
Attic insulation has one of the strongest payback records of any home improvement. The Department of Energy estimates homeowners can save 10 to 50% on heating and cooling costs by properly insulating and air sealing the attic. The range is that wide because the savings depend entirely on the starting point. An uninsulated attic in a cold climate saves far more than adding a few inches to one that already meets code.
It covers R-value targets by climate zone, which materials suit which attic types, what the project costs, and where DIY ends and a contractor begins.
What R-Value Means and How Much You Need
R-value measures how well a material slows heat movement. Higher numbers mean more resistance. The Department of Energy recommends R-38 to R-60 for attic floors depending on climate zone. Zone 1, covering South Florida and Hawaii, can work with R-30. Zone 7. It includes northern Minnesota and most of Montana, calls for R-60. The zone determines the target; what’s already in the attic determines how far you need to go.
Before ordering anything, measure the existing insulation depth with a ruler. Fiberglass batts compress over the years. They may be performing at R-13 even if the original spec was R-19. Cellulose settles too. The effective R-value of old insulation is often lower than its label suggests.
The Energy Star Rebate Finder lists available rebates and tax credits by zip code. The Inflation Reduction Act extended a 30% federal tax credit on qualifying insulation through 2032, capped at $1,200. Worth checking before buying materials.
Air Sealing First
Insulation slows heat transfer. Air sealing stops air movement. Gaps around recessed lights, pipe penetrations, and wall top plates send conditioned air straight out. Piling insulation on top of an unsealed attic floor helps. But not nearly as much as sealing the gaps first.
Move the existing insulation aside, seal every gap, then replace and add on top. Do it in the wrong order, and finding penetrations under new material means moving everything again.
- Recessed light cans: install an airtight IC-rated cover, sealed at the perimeter with caulk
- Plumbing and electrical penetrations: expanding foam for gaps under 1 inch; backer rod plus caulk for larger openings
- Attic hatch: add weatherstripping around the perimeter and glue rigid foam board to the back of the door—an uninsulated hatch is a significant heat loss point regardless of what surrounds it
- Interior wall top plates: the gap where partition walls meet the attic floor often connects directly to the stud cavities below—seal with foam
Air sealing without adding insulation can cut energy costs by 10 to 20% on its own. It’s also the step contractors most often skip when adding blown-in material over an existing attic floor.
Insulation Materials
Fiberglass batts
Pre-cut rolls that friction-fit between standard 16- and 24-inch joist spacing. Straightforward to install in clean, accessible attics with consistent framing. The fit needs to be snug but not compressed. A batt forced into a space too shallow for it performs below its rated R-value. Use the right thickness or layer batts to reach the target depth.
Batts lose their advantage in attics with irregular spacing, multiple penetrations, or obstructions. In those spots, blown-in material fills more completely.
Blown-in insulation
Both fiberglass and cellulose blown-in products cover irregular surfaces. They work around obstructions that defeat batts. Cellulose is recycled paper treated with fire retardant—roughly 80% post-consumer content. Fiberglass blown-in has a slightly lower settled R-value per inch but doesn’t absorb moisture if the attic develops a leak, whereas cellulose will.
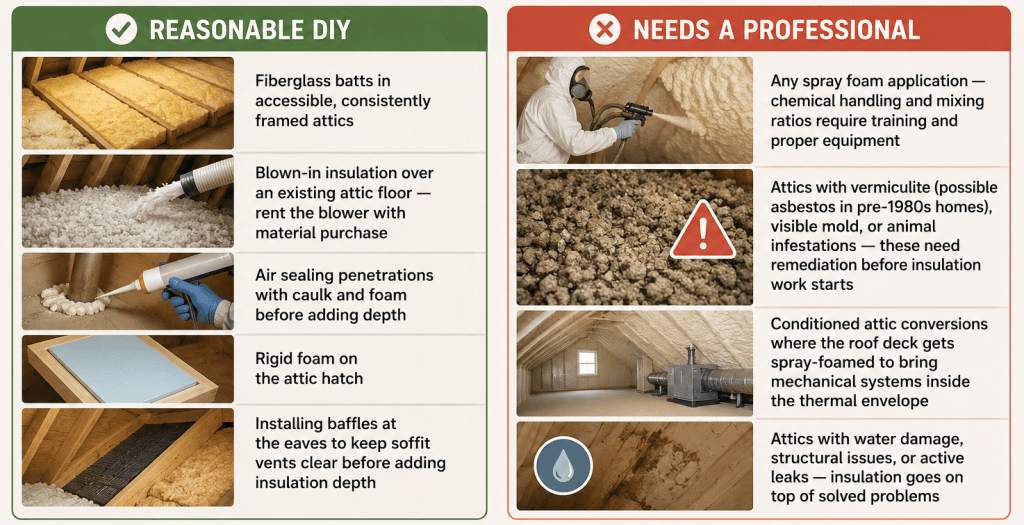
Both are DIY-accessible. Home Depot and Lowe’s loan blower machines with material purchase—typically 20 bags qualifies for the free machine. A 1,000-square-foot attic going from zero to R-38 needs roughly 20 to 25 bags of cellulose. Budget a half-day with one helper.
Spray foam
Two versions serve different purposes. Open-cell foam expands to fill cavities and air-seals simultaneously at R-3.5 per inch—lower cost, less dense. Closed-cell foam is denser, adds structural rigidity, functions as a vapor barrier, and reaches R-6 to R-7 per inch. Both require professional installation — the chemical ratios are precise enough that inconsistent mixing produces poor results, and the off-gassing during application requires proper PPE and ventilation.
Spray foam suits the underside of the roof deck in conditioned attics, rim joists, and anywhere air sealing and insulation need to land in a single pass.
Rigid foam board
Cuts with a utility knife, score-snaps cleanly. Best for attic hatches, thermal bridges, and layering over existing material where headroom allows. At scale, batts or blown-in are more cost-effective for open attic floors.
Materials at a Glance
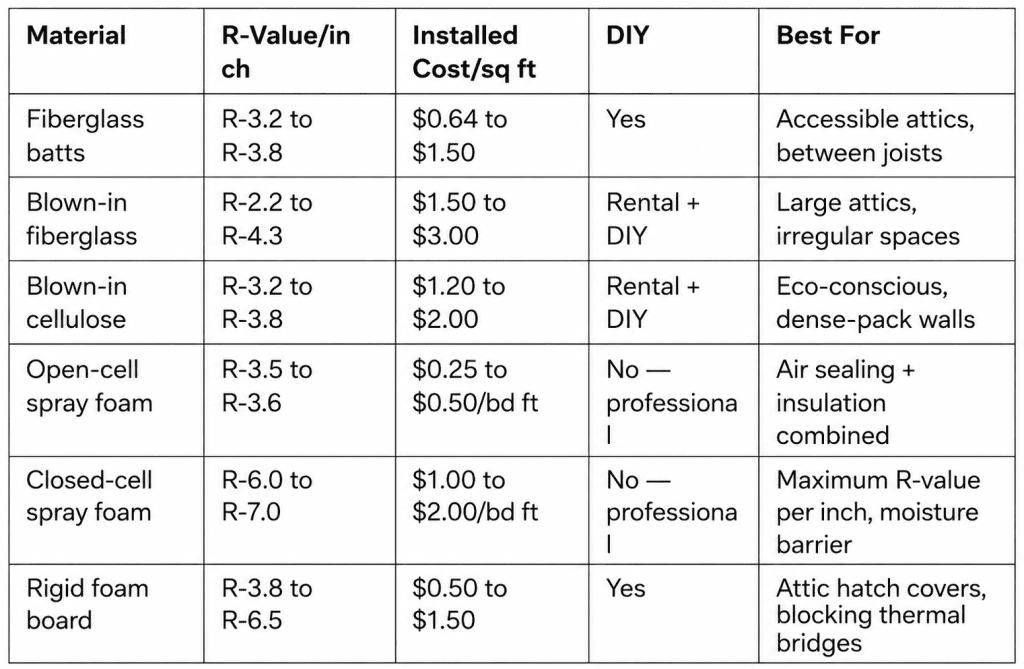
R-values and cost ranges sourced from Department of Energy insulation reference and Energy Star attic insulation guide.
What It Costs
Professional attic insulation installation runs $1,500 to $6,500 for a typical home. Spray foam sits at the high end; blown-in cellulose is the low end for professional work.
DIY blown-in cuts that cost sharply. Material for a 1,000-square-foot attic to R-38 runs $300–$600 depending on type and existing depth. The blower is typically included with the purchase of material. Labor is a half-day to a full day for two people.
Energy Star puts average payback on attic insulation at less than five years in most US climates when air sealing is included. The 30% federal tax credit further reduces the net cost.
DIY or Professional
Mind the Vents
Vented attics need 1 square foot of net free ventilation area per 150 square feet of floor area per building code. When adding blown-in depth, foam or cardboard baffles need to go in at each rafter bay where the roof deck meets the top plate—these create a channel that keeps the soffit vents open regardless of how deep the insulation gets.
Block the soffit vents with insulation and moisture builds up—condensation on the roof deck, mold on framing, rot not far behind. The baffles cost a few dollars each and take an hour to install across a typical attic. Skipping them is the most common DIY insulation mistake.
Bottom Line
In most older homes, gaps around lights, pipes, and wall top plates lose more heat than thin insulation does—seal those first. Check the existing depth, calculate the gap to your zone’s recommended R-value, and choose material based on the attic’s geometry. Blown-in cellulose is the most cost-effective DIY path for open attics with existing joists. Check the Energy Star Rebate Finder before buying—the federal tax credit and utility rebates add up. Spray foam and attics with damage or moisture issues need professional attention before anything else goes in.
Sources
Every external claim in this guide links to its origin. Collected automatically from the text above.
- The Department of Energy estimates — energy.gov
- The Energy Star Rebate Finder — energystar.gov
- cut energy costs by 10 to 20% — energy.gov
- Cellulose is recycled paper treated with fire retardant — firefighternation.com
- Energy Star attic insulation guide — energystar.gov
- $1,500 to $6,500 — hudcoroofing.com
- less than five years — energystar.gov
- 1 square foot — codes.iccsafe.org

Dave Blomqvist
Dave writes about exterior maintenance, structural repair, and outdoor projects for Decor Modern. If it's on the outside of your house — siding, garage doors, decks, gutters, or that rotting windowsill you've been ignoring — it's probably in his territory. Dave spent over a decade working in residential construction in the Pacific Northwest, where rain doesn't ask permission and wood rot is a year-round job. He started as a framing carpenter, moved into exterior restoration, and eventually ran his own small crew specializing in deck builds and siding replacement. Over the years, he worked on hundreds of exterior repair and construction projects in real-world weather conditions. That hands-on background shapes how he writes: he knows which product specs actually matter on a job site and which ones are just marketing. He knows which materials fail over time, which installations hold up, and what shortcuts typically lead to expensive repairs later. On Decor Modern, Dave authored the garage door replacement cost guide and the home value ROI series. He's the team's go-to voice on anything structural — when a floor sags, a door frame shifts, or a homeowner needs to know whether a crack is cosmetic or warrants calling an engineer. He focuses on helping homeowners distinguish between cosmetic issues and structural problems that require professional evaluation. Dave lives in Oregon with his wife and two dogs, in a 1970s split-level that he describes as "a never-ending punch list."