Here’s what most DIYers don’t realize: cutting drywall is the easiest part of hanging drywall panels. Measuring accurately and handling those heavy 4×8 or 4×12 sheets present the real challenge, along with securing everything properly.
You’ll save money and reduce material waste by knowing how to measure and cut drywall sheets correctly, whether you’re finishing a basement, repairing damaged walls, or tackling a full room renovation. We’ll walk you through the complete process of measuring, cutting, and installing drywall like a pro in detail. You’ll learn the best tools for cutting drywall straight and how to handle outlets and fixtures. You’ll also discover when this project makes sense as a DIY task versus calling in professionals, which matters most.
When and Why You Need to Know How to Measure, Cut, and Install Drywall
Common DIY Scenarios That Just Need Drywall Work
Small repair projects make the most sense for DIY drywall work. Patching holes from door handles, fixing minor cracks from settling, or covering nail pops in non-critical areas like storage rooms and garages fit within most homeowners’ capabilities. Single accent walls or small basement projects also work well for those with previous experience and proper tools.
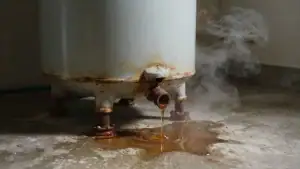
Water damage just needs immediate attention but often signals the need for professional help. Once you stop the leak, replacing damaged drywall sections becomes necessary to prevent mold growth. Minor holes and dents respond well to DIY patching. Cracks wider than 1/8 inch or holes larger than 6 inches just need professional assessment to determine if structural issues exist underneath.
Research shows that 70% of US citizens now handle home repairs themselves to save money. Homeowners take on drywall projects during basement finishing, room additions, or when creating new living spaces. The decision to DIY depends on your comfort level with extended timelines and acceptance of results that may not be perfect in non-visible areas.
The Cost Difference Between DIY and Professional Installation
DIY material costs range from $50 to $200 per room, but this figure excludes tool purchases and potential waste from mistakes. First-time DIYers just need to budget $200 to $500 for tools that have lifts, saws and finishing equipment. Hidden expenses emerge when errors just need professional correction and eliminate initial savings.
Professional installation costs $2 to $4 per square foot and has materials, labor, tools and expertise. Labor alone runs $1.50 to $3 per square foot. DIY appears cheaper at first. Factor in your time value and mistake correction costs though, and professional service often becomes more economical.
What Skill Level Is Just Needed for This Project
Hanging drywall is physically demanding but straightforward from a technical standpoint. A determined DIYer can become competent after completing one or two rooms. The real challenge lies in finishing work and just needs hand-eye coordination and muscle memory that develops only through practice.
DIY projects take weeks or even months to complete for inexperienced homeowners. This timeline has learning proper techniques, actual installation and correcting mistakes. Professional contractors complete the same work in just a few days due to their experience and efficient processes.
Quality differences become apparent over time. Amateur finishing often shows visible imperfections that affect resale value and just need future professional correction. Understand that hanging sheets yourself while hiring professionals for finishing often delivers the best balance of cost savings and quality results before you commit to DIY.
Tools and Materials You Need for Cutting Drywall

Image Source: Popular Mechanics
Essential Measuring Tools
Accurate measurements prevent material waste that can get pricey. A 25-ft tape measure works best. Its wider, stiffer blade extends farther without bending and makes solo measurements easier. Besides the tape, a 4-ft aluminum T-square handles most marking and cutting tasks. The square butts against the panel’s tapered edge and hangs perpendicular across the face. It serves as both a measuring guide and a straight cutting edge.
Bigger drywall sheets need 48-inch to 54-inch T-squares that match the height of larger panels or high-ceiling rooms. A 24-inch framing square helps transfer measurements to cut openings for electrical boxes and fixtures after you attach panels. Chalklines mark straight lines too long for a T-square. A scriber fits drywall against irregular surfaces like wavy ceilings and follows their contours.
Best Tools for Cutting Drywall Sheets
A razor utility knife remains the primary tool to cut drywall sheets. You score the panel along a straight edge, apply pressure and snap for a clean break. Fixed-handle utility knives withstand more pressure than retractable models.
A keyhole saw (also called a jab saw) plunges into drywall and cuts both straight and curved openings for outlet and fixture holes. Oscillating multi-tools excel at plunge cuts and tight repairs. Spiral saws or rotary tools create fast, precise cutouts for electrical boxes. Hole saws work for circular pipes like sink drains.
Safety Gear and Protective Equipment
N95 respirators filter at least 95% of fine gypsum and silica dust particles that cause respiratory irritation. Safety goggles with snug seals prevent airborne dust from reaching your eyes. Long sleeves, work gloves and protective clothing create barriers against skin irritation from dust contact.
Materials Checklist: Drywall Types, Screws, and Joint Compound
Standard drywall screws measure 5/8-inch for most installations. Space screws 12 inches apart along framing members for proper weight distribution. Joint compound comes in different types for taping and finishing stages.
How to Measure, Cut, and Install Drywall: Step-by-Step Process
Step 1: Measure Your Walls and Calculate Drywall Sheets Needed
Measure the height and width of each wall in feet. Multiply to get square footage. Add all wall measurements together for total coverage. Divide this number by 32 for standard 4×8 sheets to determine how many panels you need. Add 10% extra material to account for cutting waste and mistakes.
Step 2: Mark and Score Drywall for Straight Cuts
Position your T-square along the cutting line on the drywall’s face side. Draw a pencil line and score through the paper layer using firm pressure with a sharp utility knife. You don’t need to cut through the entire gypsum core.
Step 3: How to Cut Drywall Using the Snap Method
Line up the scored line at your work surface edge. Apply pressure to snap the gypsum core cleanly along the score. Cut the back paper with your utility knife to separate the pieces.
Step 4: How to Cut a Hole in Drywall for Outlets and Fixtures
Measure the outlet location from two reference points and transfer measurements to your panel. Hang the sheet loosely with a few screws. Use a drywall router to cut counterclockwise around the box. You can also mark dimensions, drill corner pilot holes and cut with a keyhole saw.
Step 5: Hang and Position Drywall Panels
Hang sheets horizontally to reduce seam footage by 25% on walls under 9 feet. Leave a 1/2-inch gap at the floor. Panels should have edges that land on stud centers.
Step 6: Secure Drywall with Screws and Proper Spacing
Space screws 16 inches apart in wall field areas and 8 inches along edges. Use 12-inch field spacing for ceilings and 7 to 8 inches at edges. Drive screws just below the paper surface without tearing through.
Common Mistakes, Risks, and When to Call a Professional
Mistakes That Guide to Poor Fits and Wasted Material
Inaccurate measurements account for roughly 15% of drywall installation problems. Cutting sheets too short creates gaps that need excessive joint compound. Cutting them too long causes edge crumbling when forced into place. Measurement errors also waste material since drywall costs add up quickly in multiple rooms.
How to Avoid Cracking and Breaking Drywall
Temperature and humidity fluctuations cause expansion and contraction that cracks over time. Leave a 1/8-inch gap between boards to allow movement without tearing tape or breaking mud. Structural settling and foundation changes create stress points. These show up as diagonal cracks from corners. Avoid placing butt joints at doors and windows where building movement concentrates.
What Can Go Wrong During Installation
Improper fastening causes 20% of drywall flaws and results in panel movement and cracks. Overdriving screws breaks the paper surface and reduces holding power. Insufficient fastening leaves panels loose. Weak seams from missing backing support account for 12% of structural concerns. Visible seams and uneven surfaces appear when joint compound is applied too thick or dries too fast.
Time and Effort Estimates for DIYers
Drywall installation takes 4 days to 4 weeks depending on project size. Small repairs finish in one to two days. Full room installations need three to seven days. Professional crews complete the same work in a fraction of the time due to experience and proper equipment. Standard drywall sheets weigh around 51 pounds, which makes solo work demanding.
When DIY Drywall Work Isn’t Worth the Risk
High ceilings and complex architectural details like arches require professional assistance. Water damage also needs expert help. Professionals understand building codes and fire safety requirements. They know how to handle unexpected structural challenges. DIY mistakes often cost more to fix than hiring experts at the time, especially when poor workmanship affects resale value.
Conclusion
You now have everything to measure, cut and install drywall for straightforward projects. Small repairs and single walls make sense for DIY work if you’re comfortable with the physical demands and extended timelines.
Most homeowners save money when they hang sheets themselves and hire professionals for finishing work. This approach delivers quality results without the steep learning curve.
Complex projects with high ceilings or structural concerns require experts from the start. Your time and potential mistake corrections will cost more than professional installation.
FAQs
Q1. Is it cheaper to install drywall yourself or hire a professional? DIY material costs range from $50 to $200 per room, but you’ll need to budget an additional $200 to $500 for tools if you’re starting from scratch. Professional installation costs $2 to $4 per square foot including materials and labor. While DIY appears cheaper initially, factoring in your time, potential mistakes, and correction costs often makes professional service more economical, especially for larger projects.
Q2. What tools do I absolutely need to cut and install drywall? The essential tools include a 25-foot tape measure, a 4-foot T-square for marking straight lines, a sharp utility knife for scoring and cutting, drywall screws, and a screw gun or drill. For cutting holes around outlets and fixtures, you’ll need a keyhole saw or rotary tool. Don’t forget safety equipment like an N95 respirator, safety goggles, and work gloves to protect against gypsum dust.
Q3. How do I calculate how many drywall sheets I need for my project? Measure the height and width of each wall in feet, multiply them to get square footage, then add all walls together. Divide the total square footage by 32 (the coverage of a standard 4×8 sheet) to determine how many panels you need. Always add 10% extra material to account for cutting waste and potential mistakes.
Q4. Should drywall be hung horizontally or vertically? For walls under 9 feet, hang drywall sheets horizontally to reduce seam footage by approximately 25%. This orientation creates fewer joints to finish and provides better structural strength. Position panels so the edges land on stud centers, and leave a 1/2-inch gap at the floor to allow for settling.
Q5. When should I call a professional instead of doing drywall work myself? Call a professional for projects involving high ceilings, complex architectural details like arches or tray ceilings, significant water damage, or structural concerns. Professionals understand building codes and fire safety requirements. If you’re dealing with cracks wider than 1/8 inch or holes larger than 6 inches, get a professional assessment to check for underlying structural issues.