Hardwood floor installation transforms any room, especially when you think over that hardwood floors add timeless elegance, warmth, and most important value to your property. Hardwood floors are durable and beautiful. They make a great DIY project that many homeowners tackle with proper planning and the right approach. This piece walks you through everything you need to install hardwood floors. You’ll learn about choosing materials and gathering hardwood floor installation tools. We cover laying your first board and completing professional finishing touches. Whether you’re working with solid or engineered wood, you’ll learn how to install hardwood flooring step-by-step. You’ll avoid common mistakes that derail DIY projects and know exactly when professional help makes sense.
Planning Your Hardwood Floor Installation
Proper planning prevents the expensive mistakes that derail many DIY hardwood floor projects before you purchase a single plank.
Measuring Your Space and Calculating Materials
Start by measuring your room’s length and width in feet. Multiply these numbers to calculate square footage. A room measuring 15 feet by 20 feet just needs 300 square feet of base coverage. Measure the longest and widest points of your room, especially when you have older homes where walls form perfect rectangles rarely.
Add a waste factor to your base calculation. Standard installations just need adding 10% to account for cuts and mistakes. A 300 square foot room means you should order 330 square feet. Diagonal, herringbone, or bordered installations just need higher percentages. Many homeowners who skip this step find themselves short on material mid-project and often face mismatched dye lots when purchasing additional planks.
Rooms with closets, alcoves, or irregular shapes just need you to measure each section and add the totals together. Break complex layouts into rectangular sections to make calculation easier.
Choosing Between Solid and Engineered Hardwood
Engineered hardwood uses a plywood core with a thin layer of hardwood on top. This offers an affordable and water-resistant alternative to traditional hardwood. But unlike solid hardwood you can’t refinish the flooring as often.
Solid hardwood consists of 3/4-inch thick boards that must be installed over plywood subfloors at or above ground level. Engineered hardwood works over concrete and in moisture-prone areas where solid wood fails. Budget and flooring location determine which option suits your project.
Understanding Acclimation Requirements
Acclimation allows wood flooring to adjust to your home’s temperature and humidity before installation. This prevents gaps, buckling, and warping after you install. Most hardwood floors just need 3 to 10 days to adapt. Engineered hardwood just needs 48 to 72 hours.
Your home must maintain stable conditions during acclimation:
- Temperature: 60°F to 80°F consistently
- Relative humidity: 30% to 50%
- Moisture content: 6% to 9% for most hardwood floors
Acclimation is complete when the flooring’s moisture content matches your subfloor, not when a certain number of days has passed. Use a moisture meter to verify the moisture content difference between planks and subfloor stays within 2% to 4% for solid hardwood and 1% to 2% for engineered wood flooring. Stack boxes flat with spacers between them to allow airflow during the acclimation period.
Checking Your Subfloor Condition
Your subfloor must be clean, dry, level, and structurally sound before installation begins. Test wood subfloors with a pin-type moisture meter and take minimum 20 readings per 1,000 square feet. Subfloor moisture content should measure 12% or less. The difference between your subfloor and flooring moisture content should not exceed 4%.
Check levelness using a straight edge or laser level. Industry standards allow only 1/8 inch variation within 6 feet or 3/16 inch within 10 feet. Fill low spots with leveling compound and sand down high spots before you proceed.
Remove old adhesives, protruding nails, dust, and debris that interfere with installation. Repair soft spots, water damage, and squeaky boards by securing loose plywood to joists with screws. Concrete subfloors just need you to verify relative humidity stays at 75% or less using ASTM F-2170 testing methods.
Essential Hardwood Floor Installation Tools and Materials
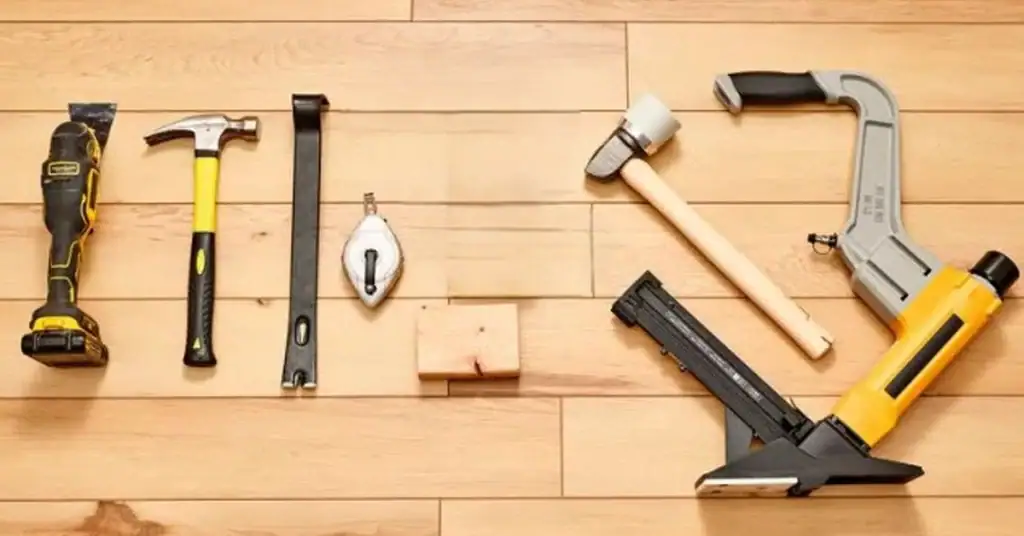
Image Source: Easiklip Floors
Gathering the right hardwood floor installation tools separates successful DIY projects from frustrating multi-week ordeals. Your toolkit needs three categories: simple hand tools, power equipment, and flooring-specific instruments that make installation possible.
Simple Hand Tools You’ll Need
A 25-30 foot tape measure handles room measurements and board length calculations. Chalk lines create straight reference guidelines on your subfloor and prevent crooked rows that compound with each plank. You’ll need a pry bar to remove existing baseboards and old flooring without damaging wall studs. Keep a standard hammer handy for areas your pneumatic nailer can’t reach, especially the first and last rows. A utility knife trims underlayment and makes precision adjustments throughout installation. Carpenter’s squares ensure 90-degree accuracy when cutting boards for corners and doorways. Wooden or plastic spacers maintain consistent expansion gaps along all walls.
Power Tools for Faster Installation
A miter saw (chop saw) delivers clean crosscuts and angled edges where boards meet walls, corners, or transitions. Table saws handle lengthwise rips, especially for the final row that almost always requires narrower planks. Circular saws with fine-tooth blades offer portability for cutting in tight spaces. Jigsaws cut curves around heating vents, pipes, and irregular corners that straight saws cannot handle. An oscillating multi-tool undercuts door jambs so planks slide underneath for seamless transitions between rooms.
Flooring-Specific Equipment
Pneumatic flooring nailers drive fasteners through tongue-and-groove joints at the correct 45-degree angle, which manual nailing rarely achieves. These require an air compressor. Most homeowners rent both rather than purchase. A moisture meter tests both subfloor and flooring before installation, with the NWFA requiring moisture testing and documentation to protect against future warranty claims. Tapping blocks allow you to hammer planks together without damaging edges. Pull bars close gaps in the final row where mallets won’t fit. A floor roller presses glue-down installations evenly into adhesive.
Underlayment and Moisture Barrier Options
Felt paper, specifically 15-pound asphalt-saturated flooring felt, serves as the standard for nail-down solid hardwood over wood subfloors. Foam underlayment works for floating engineered installations, with many products including built-in moisture barriers for concrete subfloors. Cork provides superior sound absorption for second-story rooms and condos, though it requires separate moisture barriers as cork absorbs water. Rubber offers maximum sound insulation and moisture resistance but costs more than other options. Vapor barriers prevent moisture from wicking upward and damaging your floor on concrete slabs.
Safety Gear and Protective Equipment
ANSI-rated safety goggles protect against flying wood chips during cutting. Dust masks rated N95 minimum filter sawdust, while vapor respirators handle adhesive fumes. Contractor-grade knee pads with cloth construction prevent pain during hours of kneeling work. Steel-toed work boots protect feet from dropped planks and tools. Heavy-duty gloves with reinforced fingertips shield hands from splinters, cuts, and adhesive chemicals. Ear protection matters when operating power saws and pneumatic nailers for extended periods.
Preparing Your Space for Installation
Actual hardwood floor installation begins with preparing the space properly. Mistakes during removal and cleaning create problems that appear only after your floor is down.
Removing Existing Flooring and Baseboards
Cut any caulk seal along the top edge of baseboards with a utility knife before prying, or you’ll tear drywall paper off the wall. Use a pry bar with a wide baseboard removal tool that distributes force across the drywall rather than punching through at single points. Work down the length of each piece rather than forcing one end off completely, which often breaks the molding.
Number each baseboard piece and mark the corresponding wall location to reinstall them correctly later. Pull nails through the back of removed baseboards to avoid visible holes on the face. A jamb saw becomes necessary when baseboards were installed before the existing floor and sit below floor level—you’ll need it to cut them at floor height.
Remove carpet, vinyl or laminate to avoid damaging the subfloor beneath. Pry up old flooring with appropriate tools and dispose of materials according to local regulations.
Cleaning and Leveling the Subfloor
Run a floor scraper across every inch of subfloor as if scraping ice off a driveway. Set protruding nails or staples flush with or below the subfloor surface when the scraper catches on them. Carpet staples scrape up and out, while stubborn fasteners require pliers or a chisel. Vacuum the subfloor multiple times throughout the process, after scraping and before moisture testing.
Sand seams and high spots with 36-grit sandpaper on an edger. The industry standard allows only 1/8 inch variation within 6 feet, though flatter subfloors produce better results. Fill low spots with floor leveling compound, though you cannot nail through these products.
Installing Vapor Barrier or Underlayment
Felt or rosin paper works to nail-down installations over wood subfloors. Roll out strips with 4-6 inch overlaps and staple them down. Many foam underlayment products with moisture barriers include adhesive strips to seal seams. Run underlayment slightly up the wall (trim excess later) to protect floor edges. Use one layer only, as stacking materials causes instability.
Planning Your Floor Layout and First Row
Never start installation against a wall, as few walls are square. Measure opposite walls to check if they’re parallel. Split the difference when walls measure differently to avoid wedge-gaps at the closing wall. A room where opposite walls differ by 1-3/8 inches needs 11/16 inch added to your starting measurement so each end has a manageable gap covered by trim.
Snap a chalk line parallel to your starting wall, accounting for the expansion gap (3/4 inch for solid hardwood). Verify squareness using a 3-4-5 triangle method[154]. Run a vantage line down the hallway center for rooms opening into hallways to ensure flooring flows squarely through open areas rather than following crooked walls.
Step-by-Step DIY Hardwood Floor Installation
The actual flooring installation starts once you mark your layout lines and the materials adapt.
Installing the First Three Rows
Place the first row along your chalk line with the groove facing the wall. Use 3/4-inch spacers to maintain the expansion gap. Face-nail this row through the board about 1/2 inch from the wall side and countersink nails below the surface. Pre-drill holes at a 45-degree angle for the tongue side and blind-nail through the tongue. Rack boards from multiple cases before installing to avoid uniform color patches. Many homeowners skip racking and end up with noticeable light and dark zones across their floor.
Using a Pneumatic Flooring Nailer
Switch to a pneumatic flooring nailer once you have two to four rows installed. Position the nailer’s adapter foot against the tongue, then strike the actuator with a rubber mallet to drive the fastener at the correct angle. Fasten every 6 to 8 inches along each board and within 2-3 inches of the ends. Maintain air pressure between 70 psi and 90 psi, as excessive pressure damages tongues.
Staggering Joints and Avoiding Common Patterns
Stagger end joints by 6 inches minimum between adjacent rows. Use cut-off pieces from one row to start the next, which minimizes waste and creates natural variation. Avoid H-joints where four end joints meet, as this weakens the floor’s structure.
Cutting Around Doorways and Obstacles
Undercut door jambs and casings using a piece of flooring as a height guide. An oscillating multi-tool produces clean cuts without splintering. Slide flooring underneath the cut jamb for uninterrupted transitions.
Installing the Final Rows
Switch to face nailing when space prevents using the nailer. Rip the last row to fit the remaining space minus the expansion gap. Use a pull bar hooked over the board’s edge to draw it tight against the previous row.
Maintaining Proper Expansion Gaps
Leave 3/8 inch gaps in rooms around 10 by 12 feet. Maintain 3/4 inch minimum around the perimeter for larger layouts exceeding a few thousand square feet. Engineered flooring requires minimal expansion space compared to solid wood.
Finishing Touches and Common Mistakes to Avoid
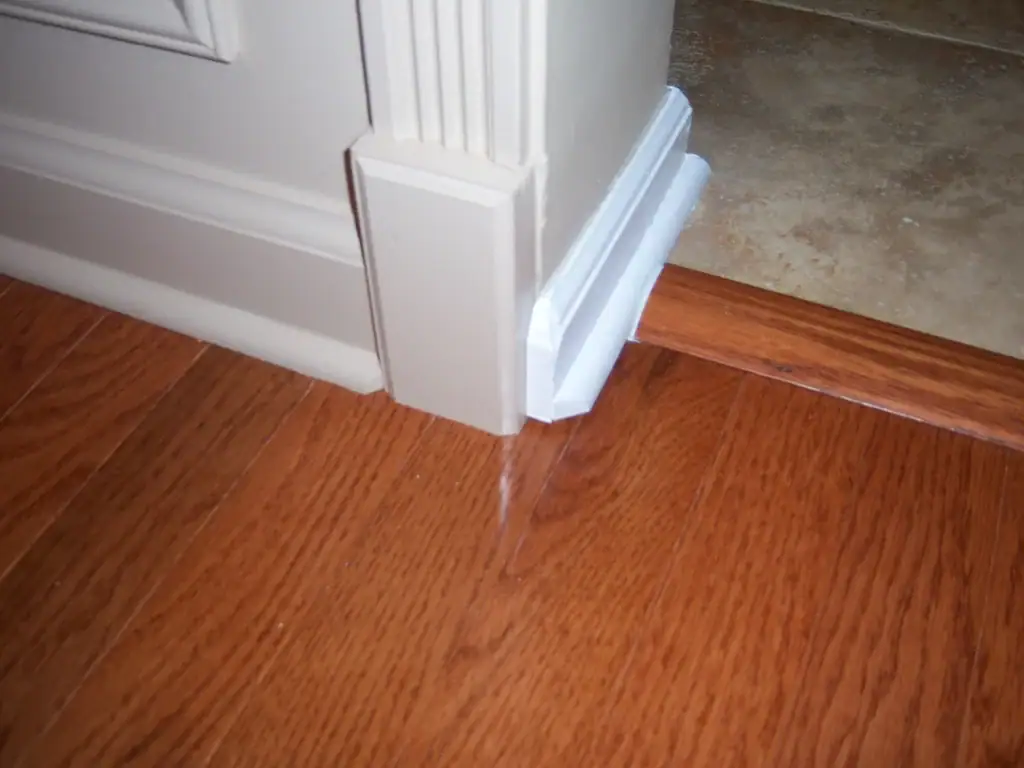
Image Source: All About The House
Your hardwood floor installation nears completion, but finishing details determine whether your work looks professional or amateur.
Installing Transition Pieces Between Rooms
T-molding works where hardwood meets another floor at equal height. Reducer molding creates smooth transitions for height differences. Gaps for wood expansion must remain when you secure transition strips. Homeowners often custom-make transitions from actual flooring planks. They route rounded edges and match with flooring varnish for seamless results.
Reinstalling Baseboards and Trim
Cope inside corners and miter outside corners for tight joints. Baseboards need nails into wall studs with fasteners penetrating at least 3/4 inch. Scribe the bottom edge to follow floor contours, especially where floors aren’t level. Measure from door casings outward and work carefully from casing edges to corners.
Filling Nail Holes and Touch-Ups
Face-nail holes need colored wood putty. Allow three days drying, then apply shellac dots over filled spots. Engineered floors often include wax crayons color-matched to your planks. Mix light and dark Minwax putty to match board colors.
Mistakes That Can Ruin Your Installation
The 3-7 day acclimation period prevents buckling or gaps when skipped. Moisture testing prevents cupping and warping. A 1/2 inch expansion gap around walls stops floor buckling during humidity changes. Nail spacing that varies creates squeaky, loose boards.
When to Call a Professional
Professionals bring specialized tools unavailable to homeowners and complete installations quickly. They provide warranties on both materials and labor that protect your investment.
Conclusion
You now have everything needed to tackle hardwood floor installation with confidence. Success comes down to preparation: accurate measurements and proper subfloor checks before laying your first plank. Acclimate your wood correctly. Take your time with each step, especially the layout and first three rows. These set the foundation for your entire floor.
Keep your moisture meter handy and maintain consistent expansion gaps. Don’t rush the process. Most DIY installations take several days to complete. But if you encounter structural issues or lack specialized tools like pneumatic nailers, professional help will give your investment decades of life.
FAQs
Q1. How long should hardwood flooring acclimate before installation? Most hardwood floors need 3 to 10 days to acclimate to your home’s temperature and humidity conditions. Engineered hardwood typically requires a shorter period of 48 to 72 hours. The acclimation is complete when the flooring’s moisture content matches your subfloor within 2% to 4% for solid hardwood and 1% to 2% for engineered wood, rather than after a specific number of days.
Q2. What’s the difference between solid and engineered hardwood flooring? Solid hardwood consists of 3/4-inch thick boards that must be installed over plywood subfloors at or above ground level. Engineered hardwood uses a plywood core with a thin hardwood layer on top, making it more cost-effective and water-resistant. While engineered hardwood works over concrete and in moisture-prone areas, it cannot be refinished as often as solid hardwood.
Q3. How much extra flooring material should I order for waste? You should add 10% to your base square footage calculation to account for cuts and mistakes during standard installations. For example, if your room measures 300 square feet, order 330 square feet of flooring. Diagonal, herringbone, or bordered installations require even higher waste percentages due to more complex cutting patterns.
Q4. What tools are essential for installing hardwood floors yourself? Essential tools include a tape measure, chalk line, pry bar, hammer, utility knife, and spacers for basic work. For power tools, you’ll need a miter saw for crosscuts, a table saw for lengthwise rips, and a jigsaw for curves. A pneumatic flooring nailer with an air compressor is crucial for proper installation, and most homeowners rent these rather than purchase them.
Q5. How level does my subfloor need to be before installing hardwood? Industry standards allow only 1/8 inch variation within 6 feet or 3/16 inch within 10 feet. The subfloor must also be clean, dry, and structurally sound with moisture content at 12% or less. Any high spots should be sanded down, and low spots filled with leveling compound before proceeding with installation.