
In this guide
You mop, the floor looks clean, and your socks still stick to it. Annoying, right? Good news—this almost always comes down to leftover cleaning product, not actual dirt, and the fix is simpler than you’d think.
What’s Causing the Tackiness
Too much cleaner. More product doesn’t mean cleaner floors. Pour in too much and there isn’t enough water to rinse away the soapy ingredients (surfactants). They dry into a thin film that grabs dust faster than before you started. A small splash per bucket is usually enough—skip the generous pour, and watch out for high-alkaline, bleach-based formulas especially.
Dirty mop water. Once your bucket water turns cloudy, you’re spreading grime instead of removing it. Mop fibers only hold so much dirt before they start dropping it back onto the floor.
Wrong cleaner for the floor. Oil-based soaps made for hardwood leave a film on tile or vinyl. Heavy cleaners meant for grout can accidentally strip a wood finish. Mismatched products are a common cause of “clean” floors that still feel grimy.
Skipping the rinse. No second pass with plain water means whatever cleaner you used just dries in place—and that dried film is exactly what feels sticky and attracts dust.
Hard water. Around 85% of U.S. households deal with water carrying higher calcium and magnesium levels. As it dries, those minerals mix with leftover soap into a stubborn coating.
Fixing It Step by Step
- Clear loose debris first. Sweep or vacuum before any liquid touches the floor—otherwise dry dirt turns to mud under your mop.
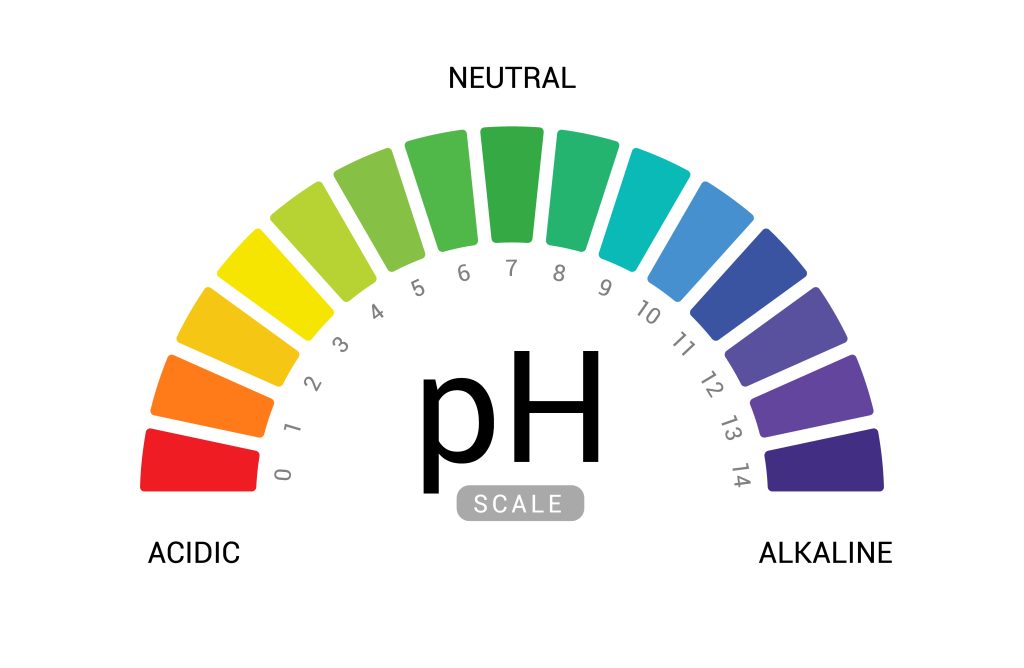
- Strip old buildup with vinegar. Mix about one cup of white vinegar per gallon of warm water. The mild acidity cuts through alkaline soap residue. Repeat on heavy buildup.
- Use the two-bucket method. One bucket for cleaning solution, one for plain rinse water. Mop a section, then rinse and wring your mop in the plain bucket before reloading with solution. You’ll never spread dirty water onto a clean floor.
- Rinse with plain water. After cleaning, go over everything again with just water until it runs clear—this removes whatever residue the cleaner left behind.
- Dry it properly. Wring the mop so it’s damp, and open a window or run a fan. A floor that’s been rinsed correctly should dry within minutes.
Choosing the Right Cleaner for Your Floor Type
Hardwood
pH-neutral cleaners only (around pH 7). Skip bleach, ammonia, and vinegar—acidity can dull or etch the finish. No steam mops; trapped moisture warps wood.
Tile and vinyl
A light vinegar mix (about ¼ cup per gallon) works for tile. Vinyl prefers pH-neutral or a slightly stronger vinegar solution. Avoid wax-based soaps—they leave the sticky film, too.
Laminate
Most pH-neutral, laminate-specific cleaners that dry fast will suit your floor type. Occasional vinegar is fine, but not for routine cleaning. Keep water use minimal.
Natural stone
Most sensitive of all—no vinegar, no lemon juice, nothing acidic. Stick to pH-neutral cleaners only.
Ensuring It Doesn’t Happen Again
- Measure, don’t eyeball. Check the dilution ratio on the label; one capful per gallon is typical for most all-purpose cleaners.
- Change mop water often—roughly every 100–200 square feet, or sooner if it clouds up.
- Keep the mop itself clean. Rinse microfiber pads after use, skip fabric softener, and hang the head up to dry fully before storing.
- Default to pH-neutral cleaners when you’re unsure about a floor type.
- Use distilled water for rinsing if your home has hard water—it leaves no mineral residue behind.
Bottom Line
Most of the time, that tacky floor is just an old cleaner that never fully rinsed off. Give it a vinegar wash to break up the buildup, mop with two buckets instead of one, and don’t skip the plain-water pass at the end. Pick a cleaner that actually suits your floor, and the sticky feeling won’t come back.
Sources
Every external claim in this guide links to its origin. Collected automatically from the text above.
- high-alkaline — cleaningsupplymart.com
- Around 85% — leafhome.com
- around pH 7 — angi.com

Nina Kowalski
Nina covers flooring, renovation planning, and DIY repair guides for Decor Modern. Her focus is translating contractor-level knowledge into step-by-step instructions that a homeowner can actually follow on a Saturday morning. Before writing about home improvement, Nina spent four years managing renovation projects for residential properties in the Midwest — coordinating work between flooring installers, painters, and general contractors. She worked on projects ranging from single-room updates to full-home renovations, gaining firsthand experience in budgeting, timelines, and contractor coordination. That experience taught her which shortcuts work, which ones backfire, and how much things really cost when the estimate meets reality. She saw how initial estimates change once work begins — and which decisions tend to increase costs or cause delays. Her most-read articles on Decor Modern include a guide to fixing scratches on hardwood floors and a breakdown of the cost to refinish hardwood floors. She also writes the site's cost comparison pieces, where she digs into real pricing data rather than repeating vague national averages. Her writing is grounded in real project constraints — including labor availability, material costs, and unexpected issues that arise during renovation. Nina holds a degree in Communications and has contributed home improvement content to several online publications. She lives in Ohio, where she is currently refinishing the original oak floors in a 1948 Cape Cod — one room at a time.