
In this guide
Thinking of building your first garden and don’t know where to start? This article covers the core steps for beginners and mistakes to avoid.
The Real Returns on a Garden
Gardening is a hobby that usually pays people back. Research shows measurable improvements in mental health and stress reduction from regular time outdoors with plants. On the financial side, Burpee’s savings breakdown estimates net savings of $80–$165 in a single growing season for beginners—one documented case showed $330.08 in net savings on just $22 in seed costs.
Physical work does the same job as a full gym session, time outside in summer gives vitamin D. Both of these things are free
Picking the Right Spot
Sunlight First
Most vegetables need at least six hours of direct sun per day. Before you build anything, spend one clear day tracking the sun across your yard at 9 a.m., noon, and 4 p.m.—mark which areas stay lit and which fall into shade as the sun moves. Do this in early to mid-spring when trees are starting to leaf out; bare branches let in more light than full canopies, so spring observations show realistic summer conditions.
South-facing spots get the most sun throughout the day and are ideal for tomatoes, peppers, and squash. East-facing areas work for crops that prefer morning light and some afternoon shade. North-facing spaces get the least light but still grow leafy greens, root vegetables, and brassicas.
Water Access and Drainage
Position the garden within easy hose reach—dragging a hose across the yard every morning gets old fast. Make sure to avoid low spots — the water pools after rain there. Standing water suffocates roots and the bed becomes inaccessible when it’s wet. Check the yard right after heavy rainfall and choose the best location.
Setting Up Your Garden
Clear the Ground
Lay 6–8 sheets of newspaper or 1–2 layers of cardboard over existing grass, cover with 3–4 inches of compost, and leave it for several months. The grass smothers underneath and the cardboard adds organic matter as it breaks down. If you need faster results, cut and remove sod manually with a sharp spade—strips about 1 foot square at 1 inch depth.
Build a Raised Bed
Standard raised beds run 4 feet wide by 8 feet long—wide enough to reach the center from either side without stepping on the soil. Minimum height is 6 inches; 16–18 inches gives better drainage and is easier on your back. Cedar boards (2 inches thick) resist rot without chemical treatment and last 10+ years. Materials run $50–$150 per bed depending on size.
Fill With the Right Soil
For raised beds, mix 50% topsoil with 50% compost. Containers need a different ratio: 50% topsoil, 25% coarse sand, 25% compost for better drainage. To calculate how much you need, multiply the bed’s length × width × height (in feet) and divide by 27 to get cubic yards. Bulk soil delivery runs $10–$150 per cubic yard—significantly cheaper than buying bagged.
Choose Your Plants
Your USDA hardiness zone determines what survives winter in your area; plant tags show zone ranges. Start with five to eight easy crops rather than attempting everything. Good first-year choices: cherry tomatoes, zucchini, bush beans, lettuce, basil, and cucumbers. All of these are forgiving, productive, and don’t require much fussing.
Check growing days on seed packets against your local last and first frost dates. Athens, GA gardeners get 200+ growing days; Springfield, MA gardeners get around 145. Choose varieties that fit your season, not just your zone.
Plant at the Right Depth and Spacing
Tomatoes need 24–36 inches between plants; lettuce just 3 inches. Beans go 1–2 inches deep with 2–4 inches of spacing. Carrots: ¼–½ inch deep, 1–3 inches apart. Proper spacing—not crowding—is one of the biggest factors in yield. Overcrowded plants compete for light, water, and nutrients, and you get less from all of them.
Water Consistently
A drip irrigation kit costs around $50 and pays for itself quickly in time saved and plants not lost to inconsistent watering. If you’re watering by hand, do it in the morning between 5 and 9 a.m.—foliage dries off before evening, which prevents fungal disease. Water deeply once or twice a week rather than lightly every day. Check soil moisture an inch below the surface; water if it’s dry, wait if it’s still damp.
Mulch After Planting
Apply 2–4 inches of mulch after planting to hold moisture, suppress weeds, and regulate soil temperature. Straw works well in vegetable beds; wood chips suit perennials. Keep mulch 2 inches away from plant stems to prevent rot at the base.
Tools Worth Buying
Most beginners overbuy. Start with these and add later if you need more:
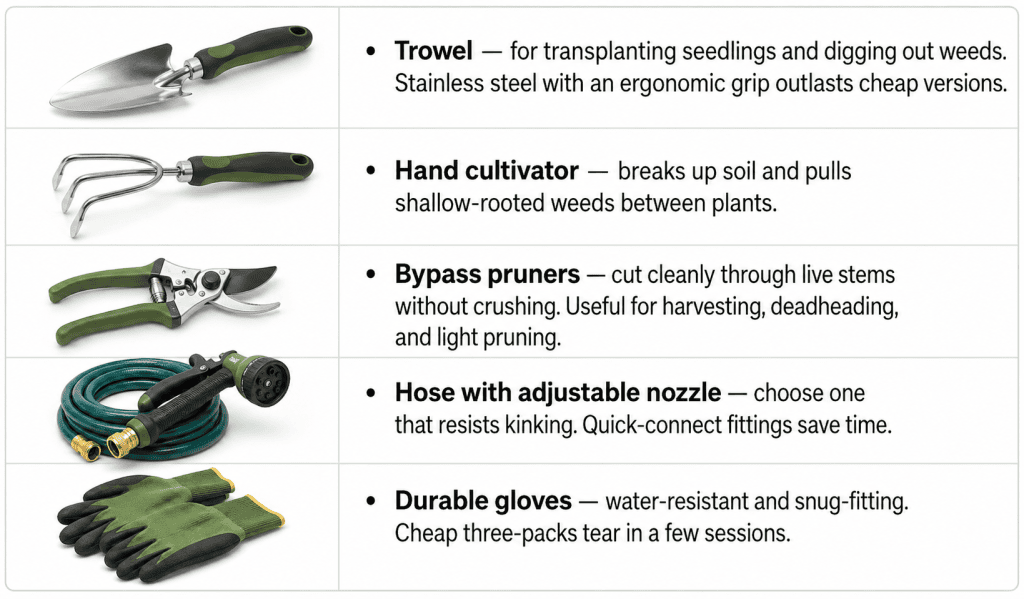
Add a garden fork, spade, and hoe once your beds expand past two or three. Skip flame weeders, mechanical seeders, tillers, and pH meters in year one—they’re not necessary until you’ve outgrown the basics.
What Goes Wrong—and How to Avoid It
Starting Too Big
A 10×10-foot plot produces plenty for a beginner while staying manageable. A 20×20 plot overrun by weeds mid-July is worse than no garden at all. It’s easier to expand next year than to salvage an overwhelming space.
Skipping Soil Prep
Soil quality determines nearly everything. Hard clay drowns roots; sandy soil loses nutrients too fast. Test before planting, then amend with compost or well-rotted manure based on results. One inch of compost applied yearly maintains soil structure; 2–4 inches builds it faster.
Overwatering
Overwatering is usually more dangerous than underwatering. Wet soil suffocates roots and causes fungal disease. Check the soil an inch below the surface before watering—if it’s still damp, leave it alone. Plants sometimes droop in afternoon heat and recover on their own without any intervention.
Ignoring Pests
Remember to check plants 2–3 times a week, especially undersides of leaves. One aphid colony can coat a plant really quickly. Early intervention is easy—hand-pick, cover with netting, or adjust watering to change conditions pests like. Waiting until the problem is visible from across the yard means a lot more work.
Not Keeping Notes
Six months after a season ends, you won’t remember which tomato variety did well or why the carrots failed. A simple notebook—variety, planting date, problems encountered, yield—takes five minutes per week and prevents repeating the same mistakes next year.
Realistic Costs at a Glance
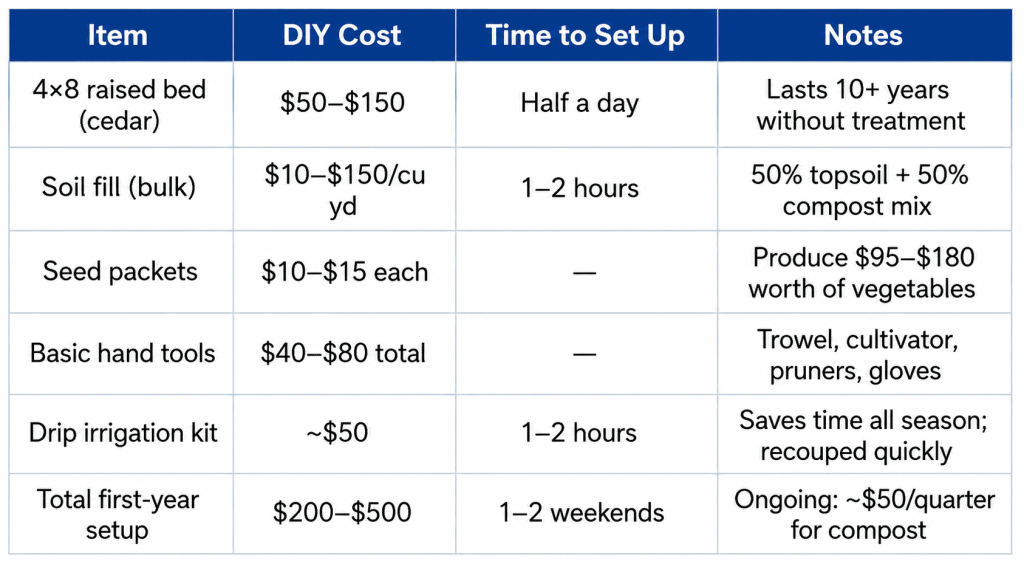
Cost data sourced from Gardenary’s raised bed cost breakdown and Fine Gardening’s raised bed construction guide.
Bottom Line
You can choose the sunniest spot in your new yard, build a small bed and plant a few crops that will suit the climate you live in. You won’t have to pay more than $200–$500 for the season or spend hours to maintain the great garden look. Try it and see if you are ready for the second season.
Sources
Every external claim in this guide links to its origin. Collected automatically from the text above.
- Research — pmc.ncbi.nlm.nih.gov
- Burpee's savings breakdown — burpee.com
- Most vegetables need at least six hours of direct sun per day — southernliving.com
- Do this in early to mid-spring — finegardening.com
- Lay 6–8 sheets of newspaper or 1–2 layers of cardboard over existing grass — yardandgarden.extension.iastate.edu
- Standard raised beds run 4 feet wide by 8 feet long — finegardening.com
- A 10×10-foot plot — threeacrefarm.net
- Gardenary's raised bed cost breakdown — gardenary.com

Nina Kowalski
Nina covers flooring, renovation planning, and DIY repair guides for Decor Modern. Her focus is translating contractor-level knowledge into step-by-step instructions that a homeowner can actually follow on a Saturday morning. Before writing about home improvement, Nina spent four years managing renovation projects for residential properties in the Midwest — coordinating work between flooring installers, painters, and general contractors. She worked on projects ranging from single-room updates to full-home renovations, gaining firsthand experience in budgeting, timelines, and contractor coordination. That experience taught her which shortcuts work, which ones backfire, and how much things really cost when the estimate meets reality. She saw how initial estimates change once work begins — and which decisions tend to increase costs or cause delays. Her most-read articles on Decor Modern include a guide to fixing scratches on hardwood floors and a breakdown of the cost to refinish hardwood floors. She also writes the site's cost comparison pieces, where she digs into real pricing data rather than repeating vague national averages. Her writing is grounded in real project constraints — including labor availability, material costs, and unexpected issues that arise during renovation. Nina holds a degree in Communications and has contributed home improvement content to several online publications. She lives in Ohio, where she is currently refinishing the original oak floors in a 1948 Cape Cod — one room at a time.