Repairing hardwood floors costs between $478 to $1,624 on average, compared to $2,480 to $7,028 or more for complete replacement and installation. That’s a most important difference, especially when many repairs are simple DIY tasks.
We’ve worked with countless homeowners who assumed their scratched or damaged floors needed professional intervention, only to find they could handle the repairs themselves. In this piece, we’ll show you how to repair hardwood floors based on damage type, from minor scratches to water damage. We’ll cover assessment and step-by-step hardwood floor repair methods, and when professional help is needed.
Assessing Your Hardwood Floor Damage
Before fixing hardwood floors, you need to identify what type of damage exists and whether it’s within DIY repair capabilities. I’ve seen homeowners waste money on professional services for simple scratches. Others attempt DIY repairs on structural damage that worsens the problem. Proper assessment saves both time and money.
What Type of Damage Do You Have?
Walk across your floor and get into the damaged areas closely. Run your hands along the boards to feel for warping that might not be visible. The damage type determines your repair approach.
Scratches are among the most common issues. The visibility depends on your floor’s finish. A matte brushed finish hides minor scratches much better than a smooth matte finish, which reflects more light and makes even small imperfections noticeable. Surface scratches affect only the top finish layer. Deep scratches penetrate into the wood itself. The scratch is more problematic if it crosses multiple boards or runs against the grain.
Dents and gouges occur when heavy objects drop or furniture with sharp legs compresses the wood fibers. Small dents respond to steam treatment, which causes wood fibers to expand back into place. Larger gouges remove actual wood material and require filling.
Water damage appears in several forms, each suggesting different severity levels:
- Cupping: Boards’ edges rise higher than the center and create a concave shape. This signals moisture absorption from below the floor
- Crowning: The board’s center rises above the edges from surface moisture exposure
- Buckling: Boards lift away from the subfloor and form peaks or waves
- Discoloration: Dark patches, gray areas, or cloudy sections where moisture has settled
- Soft spots: Areas that feel spongy or unstable when walked on
Boards near walls or sliding doors that start to darken are an early indicator of moisture intrusion. A musty smell near the floor points to trapped moisture beneath the surface, even when visible damage appears minimal.
Pet urine creates stubborn damage. Urine penetrates through the coating into the timber within 60 to 90 minutes and leaves deep, permanent discoloration that sanding won’t remove.
Gaps between planks are normal during dry winter months. Gaps that don’t close during warmer, more humid weather may indicate structural movement or installation issues.
When DIY Repair Makes Sense
Hardwood floor repair works well as a DIY project for superficial damage. Surface scratches, minor dents, small gaps, and light stains respond to home repairs using wood filler, touch-up markers, or refinishing products. Catch water spills or leaks quickly and the moisture won’t penetrate deeply. Controlled drying with fans and dehumidifiers can prevent lasting damage.
Selective board replacement stays manageable for isolated damage affecting just a few boards near sinks, entryways, or appliances. The repair requires simple woodworking skills and standard tools.
When to Call a Professional
Several situations exceed DIY capabilities. Moisture concerns demand expert attention. Signs such as cupping, warping, or discoloration may indicate problems beneath the surface. Sanding without diagnosing the moisture source can lock in issues and create more expensive repairs later.
Replacement becomes necessary if boards remain distorted after drying, large sections have separated, or dark staining runs deep. Delamination, where the top timber veneer separates from the core layer, cannot be fixed with surface repairs. Mold development requires professional remediation.
Deep scratches that run across multiple boards need surface repair specialists who use heat-bonded or tinted repair compounds. Cutting out and replacing damaged boards in engineered flooring involves removing interlocked sections carefully and trimming the locking system on replacement boards to fit them back into place.
Hardwood species matter. Harder woods, mixed-width planks, or older boards that have been sanded multiple times need controlled techniques that prevent burn marks or uneven texture. Historic floors benefit from professional handling to preserve original material.
Large square footage requires steady control of heavy sanding equipment that most homeowners don’t own. Complex layouts with tight corners, stair treads, and transitions near built-ins create trouble for DIY attempts.
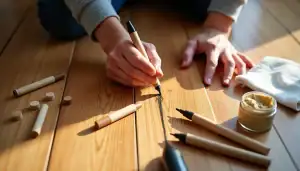
Tools and Materials You’ll Need

Image Source: Mr Sander
You need the right equipment before starting hardwood floor repair. This prevents mid-project trips to the hardware store. I’ve worked on floors where homeowners tried improvising with household items. They created deeper scratches or uneven repairs. Specific tools produce cleaner results.
Simple Repair Tools
Hand tools are the foundations for most repair work. A hammer, pry bar, and chisel remove damaged boards without harming surrounding areas. The pry bar fits between planks to lift them with care, while the chisel cleans out old adhesive or trims edges for proper fit. A sturdy putty knife applies wood filler to minor dents and scratches.
Wood filler selection matters for durable repairs. Fillers come in various brown wood tones, white, off-white, clear, and gray. Choose stainable wood filler for unfinished wood or floors you plan to re-stain. Color-changing fillers dry to a natural tone and signal readiness for sanding. Some contain wood fibers that hold screws and withstand cutting, drilling, and planing.
Repair kits provide convenience. A wood filler kit has an 8oz tub of filler, a plastic putty knife, and a 220 grit sanding sponge. The plastic spreader handles the application and smoothing, while the sanding sponge achieves final surface prep. Sizes range from small tubes for minor repairs to 64-ounce containers for large projects.
Sanding and Finishing Supplies
You’ll need either a drum floor sander or orbital sander for sanding work, plus an edger disk sander for areas near walls. Hardwood floor edger disks reach tricky spots near walls for consistent finish. Beginners benefit from sanding disks for floor buffers. These reduce the risk of grooves and valleys.
Sandpaper progression runs from coarse to fine grits. Start with coarse grit around 40 to strip old finishes and level the floor. Transition to medium grits like 60, then finish with fine grits such as 100 to prepare for final finishing. Floor sanding belts handle material removal during the process. A grade 120 mesh screen disk with pad, hand scraper, hammer, and nail set complete the sanding toolkit.
Safety Equipment
Protection prevents injuries during repairs. Safety goggles block flying debris and dust particles. Wood dust irritates lungs and worsens asthma. Wear a high-quality dust mask rated for small particles, or a full respirator with proper filters for intensive sanding. Sanding machines generate loud noise that damages hearing over time. This makes earplugs or earmuffs necessary[91].
Choose durable work gloves with reinforced fingertips. They protect hands from abrasions, splinters, and chemical contact[91]. Contractor-grade knee pads made of cloth with adjustable straps provide comfort during extended floor work. Wear closed-toe work boots with slip-resistant soles, compression resistance, and adequate cushioning. These items minimize risks while maintaining efficiency during repairs.
Fixing Minor Hardwood Floor Issues
Most minor hardwood floor damage responds to simple repair techniques. Homeowners pay for professional services on scratches that cost less than $20 to fix with the right supplies. You can prevent wasted effort and materials when you know which method works for specific damage types.
Repairing Scratches and Small Gouges
Surface scratches affect the finish layer only. Color-coordinated stain pens work for these blemishes. Rub the pen across the scratch and wipe away excess with a clean cloth. Allow it to dry. Wax sticks provide another option. Rub them over scratches like crayons, then buff with a soft cloth to blend.
Micro scratches penetrate through the finish. Wood filler or putty addresses these deeper marks. Match the filler color to your floor and apply it with a putty knife. Overfill it a bit, then smooth the surface. Drying time ranges from 15 minutes to 8 hours depending on depth. Sand the filled area flush with surrounding wood using fine-grit sandpaper once it dries.
Gouges remove actual wood material. Apply wood filler starting at the damaged area’s edge and press it into the depression with a putty knife. Fill it above floor level to account for shrinkage during drying. Sand smooth once cured, then apply matching stain or finish.
Fixing Small Dents and Dings
Dents compress wood fibers without removing material. Steam treatment expands these fibers back into place. Place a damp cloth over the dent, then press a hot iron onto the fabric for several seconds. Remove the iron when the cloth dries and check progress. Repeat if needed. This process takes 3 to 5 minutes for most dents.
Deeper dents need wood filler. Apply color-matched filler with a putty knife and let it cure overnight. Sand flush and refinish.
Filling Gaps Between Boards
Gaps appear from seasonal wood movement. Check if gaps measure 1/25 inch to 1/16 inch wide during humid months. Gaps present year-round need filling.
Flexible caulking sealant works for fluctuating gaps. Wood filler works on small openings for permanent gaps while wood strips suit wider gaps. Apply filler with a putty knife and keep it higher than the gap surface. Sand down after drying.
Addressing Surface Stains
Light water stains respond to hydrogen peroxide. Soak a cloth and dab the stain. Let it air dry overnight. Repeat if needed and allow 20 minutes of contact time for stubborn marks.
Pet stains need quick action. Mix equal parts white vinegar and water, then spray the affected area. Let it sit 5-10 minutes, then blot it. Sprinkle baking soda afterward to neutralize odors.
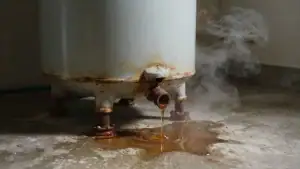
Repairing Hardwood Floors Water Damage and Major Issues

Image Source: Totta Hardwoods
Water damage remains hardwood’s worst enemy, causing warping, buckling, and black stains that resist cleaning. I’ve worked with homeowners who caught leaks early and saved their floors, while others waited too long and faced complete replacement. Speed determines whether you’ll repair or replace.
Removing and Drying Water-Damaged Areas
Use a wet vacuum or absorbent towels to remove standing water right away. Every minute counts because moisture penetrates deeper into wood grain and subfloor. Position industrial-grade fans and dehumidifiers around the affected area once you extract the water. These tools dry floors quickly and evenly without causing additional buckling.
Water-damaged hardwood floors require at least several weeks or months to dry fully, even with professional equipment, because moisture in the subfloor needs time to evaporate. Homeowners often think floors are ready after surface drying, but refinishing too soon traps moisture and worsens damage. Check the subfloor for water penetration and treat any affected areas before you proceed with repairs.
Dealing with Warped or Buckling Boards
Warped boards rarely return to original shape after moisture exposure. Identify and eliminate the water source first, whether it’s a leaking appliance, plumbing issue, or humidity imbalance. Place heavy boxes on affected boards after drying to help them flatten if buckling is minor. Severe warping requires board replacement rather than attempted flattening.
Replacing Damaged Floorboards
DIY board replacement saves $400 to $1,400 compared to contractor costs. Carefully remove damaged boards without harming adjacent planks or the subfloor. Scrape away old adhesive and debris, then vacuum the area well. Let replacement planks adjust in the room for at least 48 hours before installation to prevent future warping or gapping. Apply wood flooring adhesive to the subfloor in a zigzag pattern.
Matching Replacement Boards to Existing Floor
New planks look brighter than existing floors aged by time and sun exposure. Use unfinished wood and stain it to match if original flooring is unavailable, or take boards from inconspicuous areas like closets. Perfect color match requires patience and trial adjustments.
Sanding, Staining, and Finishing Your Repairs

Image Source: Mr Sander
Proper finishing separates amateur repairs from professional results. Homeowners often sand only the immediate repair area. This creates visible edges that highlight the fix rather than hiding it. The key lies in feathering and careful color matching.
Sanding the Repaired Area Smooth
Begin with 40-grit sandpaper to level the repair, progress to 60-grit for smoothing, then finish with 100-grit. If you skip grit progression, visible scratches will appear after staining. Sand beyond the immediate repair site using a feathering technique that blends edges into the existing floor surface. This prevents harsh transition lines.
Matching Stain Color to Existing Floor
Floors darken or yellow with age, which makes exact stain matching difficult. Test multiple stain samples on sanded planks in your actual lighting conditions. Custom mixing two or more stains often achieves better results than single pre-mixed colors. The final grit affects stain absorption since finer grits produce lighter colors.
Applying Protective Finish
Use a natural bristle brush for edges and a stain pad applicator for larger areas to apply polyurethane in thin, even coats. Three to four coats boost durability. Proper drying between coats is essential—2-4 hours for water-based or 8-12 hours for oil-based products.
Blending Repairs with Surrounding Floor
Refinish the entire room rather than spot-treating if color differences are noticeable. Screen the whole floor with 100-grit paper to create uniform texture, then apply fresh coating across all boards. This ensures consistent sheen and color throughout.
Conclusion
You have everything you need to tackle most hardwood floor repairs yourself. I’ve walked you through assessment techniques and step-by-step methods for scratches, dents, water damage, and board replacement. You understand when DIY makes sense and when professionals save you from pricey mistakes.
Successful repairs come down to proper assessment, patience during drying and curing, and careful color matching. Catch water damage early. Use the right filler for each situation and don’t rush the finishing process.
Build confidence by starting with minor repairs. Your floors will look better. You’ll save hundreds or thousands compared to professional services.
Key Takeaways
Master these essential hardwood floor repair techniques to save hundreds of dollars while achieving professional-quality results at home.
• Assess damage type first: Surface scratches need different treatment than deep gouges or water damage – proper identification prevents wasted effort and materials.
• Act fast on water damage: Remove standing water immediately and dry thoroughly for weeks before repairs to prevent permanent warping and costly replacement.
• Use progressive sanding technique: Start with 40-grit, move to 60-grit, finish with 100-grit sandpaper and feather edges beyond repair area for seamless blending.
• Match stain in actual lighting: Test multiple samples on sanded planks in your room’s lighting conditions since floors darken with age and lighting affects color perception.
• Know your DIY limits: Handle surface scratches, minor dents, and isolated board replacement yourself, but call professionals for extensive water damage, structural issues, or large-scale refinishing.
The difference between amateur and professional-looking repairs lies in patience during the finishing process and proper color matching. Start with small repairs to build confidence before tackling larger projects.
FAQs
Q1. What’s the simplest method to fix a damaged spot on hardwood floors? For small damaged areas, converting the flaw into a circular hole makes repairs straightforward. Once you create a circular opening, you can purchase or cut a matching circular wood piece to fill it perfectly. This approach eliminates the need for expensive power tools like table saws or chop saws.
Q2. Should I use wood putty or wood filler for my hardwood floor repairs? Wood filler works best for repairs before finishing or refinishing floors, as it can be sanded and stained. Wood putty is ideal for smaller scratches, scrapes, and nicks on already-finished floors. It comes pre-colored in shades like gray, brown, and tan to match your existing flooring without additional finishing.
Q3. How can I repair water-damaged finish on a small section of hardwood flooring? Start by lightly sanding the affected area with 100-grit sandpaper until the damaged wood looks fresh and the gray discoloration disappears. Then apply several thin coats of polyurethane using a foam brush, allowing 8+ hours of drying time between coats. Lightly sand between applications for a smooth finish that blends with the surrounding floor.
Q4. How long does it take for water-damaged hardwood floors to dry completely? Water-damaged hardwood floors typically require several weeks to months to dry thoroughly, even with professional-grade fans and dehumidifiers. The subfloor needs adequate time for moisture to evaporate completely. Attempting repairs before full drying can trap moisture and cause additional warping or buckling.
Q5. When should I attempt DIY hardwood floor repairs versus calling a professional? DIY repairs work well for surface scratches, minor dents, small gaps, and isolated board replacements affecting just a few planks. However, call a professional for extensive water damage with cupping or warping, structural issues, mold development, delamination, or repairs requiring specialized equipment for large areas.