Finding water pooling on your wood floor is a homeowner’s nightmare, but knowing how to repair water damaged wood floor fast can save thousands in replacement costs. Water damage can affect any home, even those managed to keep in good condition. Common culprits include leaking pipes, faulty appliances, flooding and excessive humidity. The key is to act fast, as water can cause damage in three different ways to a floor, and most wood floors flooded with water will take weeks or more to dry out fully. This piece walks you through the steps to assess, repair and restore your water damaged hardwood floors.
Understanding Water Damage on Wood Floors

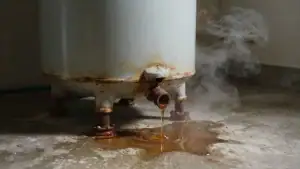
Image Source: Reddit
Common Causes of Water Damaged Wood Floors
Water damaged hardwood floors stem from various sources. Some are sudden and others gradual. Burst pipes create immediate flooding that saturates wood within minutes. Leaking appliances like dishwashers, washing machines and refrigerators often go undetected for weeks. Water seeps into floorboards slowly. Small leaks can be more damaging than sudden floods because homeowners don’t notice them until warping or discoloration appears.
Flooding from heavy rain or backed-up gutters presents another common scenario, especially in homes with poor drainage systems or low-lying foundations. Water finds its way inside through foundation cracks or under doors and pools on floors. High humidity levels also affect wood floors over time, especially in climates with damp conditions. Wood is hygroscopic, meaning it absorbs moisture from the air and causes expansion even without visible water contact.
Everyday spills play a role too. Water left standing on hardwood for extended periods penetrates through seams and joints between boards. Homeowners often underestimate how fast this happens. Windows left open during rainstorms, leaking roofs and aging plumbing systems all contribute to water damage wood floor situations that require repair.
Signs Your Wood Floor Has Water Damage
Recognizing water damage early determines whether you face minor repairs or complete floor replacement. Physical changes in the wood provide clear indicators:
- Cupping: Board edges rise higher than the center and create a concave surface. This occurs when moisture is absorbed from below the floor and causes the underside to expand more than the top
- Crowning: The center of boards bulges upward above the edges, typically from surface moisture or improper drying after water exposure
- Buckling: Boards lift away from the subfloor by 4-5 inches in severe cases and form peaks or waves that make walking difficult
- Warping: Boards become deformed, curled or twisted out of their original shape
- Discoloration: Dark patches, black or brown stains, white rings, gray areas or cloudy appearances where moisture has settled
- Soft or spongy spots: Areas that feel unstable underfoot, showing that water has weakened the wood fibers or penetrated the subfloor
- Lifting nails and floorboards: Nails begin separating as water accumulates underneath and causes the foundation to rise
- Separation and gaps: Boards pull apart or crack as moisture content changes
- Musty odors: Persistent smells near floors signal trapped moisture beneath the surface
Mold growth represents a serious concern. Mold can develop within 24-48 hours of water exposure and appears as black, green or white fuzzy spots on or around flooring. A musty smell often precedes visible mold and shows hidden moisture problems that require immediate attention.
How Water Affects Wood and Subfloor
Wood reacts to moisture in predictable but damaging ways. As a natural, porous material, hardwood absorbs water through its surface and between seams. Water doesn’t stay on top. It moves beneath the hardwood and collects between boards and the subfloor, where it becomes trapped and difficult to dry.
When wood absorbs moisture, cell walls expand. Because cellulose gets fatter but not longer as relative humidity increases, boards expand in width but maintain their length. This uneven expansion creates the cupping, crowning and buckling homeowners observe. The expansion doesn’t always occur evenly and causes boards to shift, change shape or push against each other in a phenomenon called compression set.
Moisture buildup creates pockets beneath floors and causes random elevated areas that make the surface unavailable. Water trapped in the subfloor weakens its structural integrity and potentially requires extensive sub floor repair beyond just replacing visible boards. The longer flooring remains untreated, the higher the risk of wood rot, which deteriorates wood fibers and compromises structural safety.
Temperature and drying conditions matter too. Attempting to dry wood too fast can cause additional cracking and checks as the outer shell shrinks faster than the moisture-laden center in severe water damage situations. This explains why proper drying techniques are essential when you repair water damaged wood floor damage rather than rushing the process.
Immediate Steps After Discovering Water Damage

Image Source: Texas Certified Restoration
Time matters more than perfection when water sits on your hardwood floor. Speed determines whether you repair water damaged wood floor sections or replace the entire installation. Acting within the first hour prevents moisture from penetrating deep into wood grain and subfloor layers.
Stop the Water Source
Locate and shut off the water source if safe to do so. Many homeowners waste precious minutes trying cleanup before addressing the root cause. Check common culprits first: leaking pipes under sinks, malfunctioning dishwashers, refrigerator defrost problems, dripping windows during storms and roof leaks. Shut off the water supply valve closest to the leak for plumbing problems. Turn off the main water supply and contact a plumber right away if the source remains unclear or the damage extends behind walls or ceilings.
Safety comes before salvage. Turn off electricity to affected areas if standing water is present. Water and electricity create dangerous conditions. Check ceilings and walls for sagging, which signals potential collapse. Wear rubber boots and gloves, especially when water comes from flooding or sewage backup.
Remove Standing Water Quickly
Water extraction must begin within minutes if possible. Wood flooring absorbs moisture within a short time frame. Professionals recommend completing moisture removal within 24-48 hours to minimize damage extent. The longer wood flooring and subfloor remain wet, the greater the chance that buckling will occur.
Move furniture, rugs and mats from the affected area first so you can access trapped water. Use a wet/dry shop vacuum on wet mode (without a bag) to remove as much water as possible from the surface. A wide flooring attachment on the vacuum hose works best. A squeegee helps gather water as you extract it. Microfiber cloths and mops absorb standing water quickly for smaller areas or the first round of cleanup. Wring out towels often during cleanup.
Address moisture in the air and within the wood next. Open windows and doors for ventilation if weather permits, or run air conditioning in cooling mode to help with dehumidification. Position fans to circulate air across the affected area and place dehumidifiers nearby. Run dehumidifiers for 1-2 days minimum to remove moisture from both air and wood. This drying process can take several days, but consistent airflow and reduced humidity work better than rushing with heat sources. Avoid heat guns or hair dryers. Rapid drying causes wood to warp or split.
Check beneath the floor if water penetrated through seams. Subfloor moisture requires additional drying time with dehumidifiers to prevent mold growth and structural weakening. Scrub the entire floor with a stiff brush after drying to remove dirt, mud, silt and organic material that promotes mold growth.
Document the Damage for Insurance
Document everything for your insurance claim before starting major cleanup or repairs. Notify your insurance provider right away to open a claim and get a claim number, adjuster contact information and specific documentation requirements. Write down the date, time and representative’s name.
Take complete photos and videos while water damage remains visible. Capture wide-angle shots of each affected room from doorways to show the full scope. Include close-ups of the water source, damaged flooring sections showing warping or discoloration, and water depth using a ruler in the frame. Multiple angles provide better evidence than single shots. Enable timestamp features on your camera or phone to prove when damage occurred.
Record a walk-through video and narrate what you observe: “Standing water near the dishwasher, warped hardwood floors in kitchen area”. State the date and time during recording. Create an inventory of all damaged items. Include their description, purchase date, approximate cost and current condition. Photograph each damaged item.
Keep every receipt related to the incident: emergency repairs, water extraction equipment rentals, hotel stays if your home becomes uninhabitable, storage unit costs and cleaning supplies. These expenses may qualify for reimbursement under additional living expenses coverage, but missing receipts mean no reimbursement.
Step-by-Step Guide to Repair Water Damaged Wood Floor
Repairing water damaged hardwood floors needs a systematic process once you complete emergency water removal. These six steps guide you through professional-grade restoration techniques homeowners can apply with the right tools and patience.
Step 1: Assess the Extent of Damage
Use a moisture meter with insulated pins to measure moisture content at multiple depths in both flooring and subflooring. Penetrating moisture meters provide readings inside boards, not just surface levels. Target moisture content should reach within 2 percent of the floor’s normal in-use levels. Scan with infrared cameras to detect temperature differences that reveal hidden moisture pockets. Check unaffected areas for baseline comparison. This assessment determines which boards need replacement versus drying.
Step 2: Dry the Area Really Well
LGR dehumidifiers should be positioned in the room’s center and run on highest settings for at least 24 hours minimum. Place multiple fans to increase airflow across damp sections. Access crawlspaces or basements for beneath-floor moisture and point fans upward toward subflooring. Heat sources that cause cracking should be avoided. Drying takes days to weeks depending on water penetration depth. Your moisture meter should be used daily until readings stabilize below 15 percent.
Step 3: Inspect for Mold Growth
Check all seams and crevices for mold within 24 to 48 hours of water exposure. Look for black or green patches. Musty odors suggest hidden contamination. Scrub small spots under 10 square feet with baking soda and water solution, then vacuum moisture. Larger mold areas exceeding 10 square feet need professional remediation due to health risks and structural penetration.
Step 4: Remove and Replace Damaged Boards
Mark damaged board edges with painter’s tape. A circular saw set to board thickness should cut along seams in an H-pattern for easier removal. Pry out pieces with a flathead screwdriver or chisel. Clean exposed areas of debris and old adhesive. Measure replacement boards and trim tongue or groove edges for snug fitting. Wood glue should be applied to edges, then position the boards to match grain direction and tap flush with surrounding boards.
Step 5: Check and Repair the Subfloor
Subflooring should be inspected for swelling, distortion, or soft spots. Cut out compromised sections of damaged plywood subfloor and install patches between floor joists. Construction adhesive should be applied to new plywood pieces. Fasten with 2x support pieces screwed to joists. Wood hardener can restore bearing strength in small areas with minor damage. Replace subflooring if moisture, mold, or structural weakness persists.
Step 6: Sand and Refinish the Wood Floor
Once you confirm dryness is complete, rent a drum sander for large areas and an edge sander for corners. Start with 60-80 grit sandpaper, progress to 120 grit, then finish with 220 grit between coats. Sand with the grain in small sections. Vacuum and wipe with tack cloth. Apply matching stain if needed, then two to three coats of polyurethane finish. Each coat should dry before you apply the next. Most water damaged wood floors need refinishing after drying.
When to Call a Professional vs DIY Repair

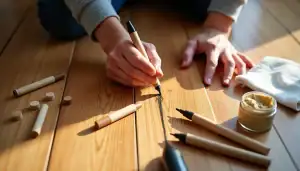
Image Source: Homebuilding & Renovating
Not every water damaged wood floor project just needs professional intervention, but you save money and prevent further damage by recognizing your skill limits. Some repairs demand specialized equipment and expertise that homeowners don’t possess.
Signs You Need Professional Help
Call a professional when damage involves:
- Buckling in large areas or affecting more than 30% of flooring
- Mold growth beyond 10 square feet that has spread widely
- Deep stains that won’t sand out during refinishing attempts
- Subfloor structural damage that requires joist or support repairs
- Color matching existing floor stain and sheen, which requires professional experience
Complex water damage wood floor repairs without proper skills often create worse problems. Professionals use moisture meters to detect trapped water you might miss and test for hidden mold growth.
Cost Considerations for Wood Floor Water Damage Repair
Water damage repair costs USD 1,000 to USD 6,000 or more when subfloors are affected. Per-square-foot pricing ranges from USD 10 to USD 80 depending on material removal and replacement extent. Labor alone runs USD 330 to USD 2,400 for most hardwood floor fixes. You get accurate pricing for your specific situation by getting multiple quotes from local contractors.
Tools and Materials Needed for DIY Repair
DIY repairs just need moisture meters, sanding equipment for larger areas, wood filler, replacement boards that match your wood type, and finish to match existing floors. Hardwood floor repair kits cost USD 15 to USD 80, wood putties run USD 4 to USD 15, and floor markers cost USD 6 to USD 13.
Preventing Future Water Damage to Wood Floors

Image Source: Floor Sanding London, Wooden Flooring & Parquet Restoration
Maintenance Tips to Protect Your Floors
Repairing water damage wood floor issues takes more effort than prevention. Conduct quarterly inspections of all plumbing fixtures, supply lines and appliance connections. Replace washing machine hoses every 5 years and upgrade to stainless steel braided versions that resist bursting. Install water detection alarms near water heaters, washing machines, dishwashers and under sinks. These devices alert you when moisture appears and prevent minor leaks from becoming major damage.
Place waterproof mats under washing machines, water heaters and dishwashers to contain small leaks. Seal your hardwood floors every few years to create a moisture barrier against spills. Know where your main water shutoff valve is located. Ensure all household members can operate it.
How to Monitor Humidity Levels
Wood floors expand and contract as humidity changes. Maintain indoor humidity between 30% and 50% using a hygrometer to monitor levels. Use humidifiers during heating seasons to prevent dryness. Dehumidifiers or air conditioning remove excess moisture in summer.
Quick Response Plan for Spills and Leaks
Wipe up spills before water seeps between boards. Check pipes and appliances for leaks regularly and address them quickly. Avoid wet mopping, as water penetrates wood and causes damage.
Conclusion
You now have everything needed to repair water damaged wood floor sections and restore your home’s value. Speed matters most when water strikes your hardwood. Act within the first hour, dry the area completely, and follow the proper repair sequence. These steps will determine whether you save your floors or face replacement that can get pricey.
Don’t wait for damage to spread. Assess the situation, tackle what you can handle, and call professionals when damage exceeds your skill level. Implement those prevention strategies to avoid future headaches. Your floors will thank you. Your wallet will too.
FAQs
Q1. How long does it take for water damaged hardwood floors to dry completely? Most water damaged hardwood floors take several days to weeks to fully dry out, depending on the depth of water penetration. Use dehumidifiers and fans continuously for at least 24-48 hours minimum, and monitor moisture levels daily with a moisture meter until readings stabilize below 15 percent.
Q2. Can I repair water damaged wood floors myself or do I need a professional? You can handle DIY repairs for minor damage affecting small areas, such as a few warped boards or surface stains. However, call a professional if damage covers more than 30% of your flooring, involves widespread mold growth beyond 10 square feet, includes subfloor structural damage, or requires complex color matching and refinishing.
Q3. What are the first things I should do when I discover water on my hardwood floor? Immediately stop the water source if safe to do so, then remove standing water within the first hour using a wet/dry vacuum or towels. Turn off electricity to affected areas if water is present, document the damage with photos for insurance, and start drying the area with fans and dehumidifiers within 24 hours to prevent mold growth.
Q4. How much does it cost to repair water damaged hardwood floors? Water damage repair typically costs between $1,000 to $6,000 or more, with per-square-foot pricing ranging from $10 to $80 depending on the extent of damage. Labor costs alone run $330 to $2,400 for most repairs. The final cost depends on whether subfloor replacement is needed and how many boards require replacement.
Q5. What humidity level should I maintain to prevent water damage to wood floors? Maintain indoor humidity between 30% and 50% to prevent water damage and minimize expansion and contraction of wood floors. Use a hygrometer to monitor levels regularly, run humidifiers during dry heating seasons, and use dehumidifiers or air conditioning in summer to remove excess moisture.