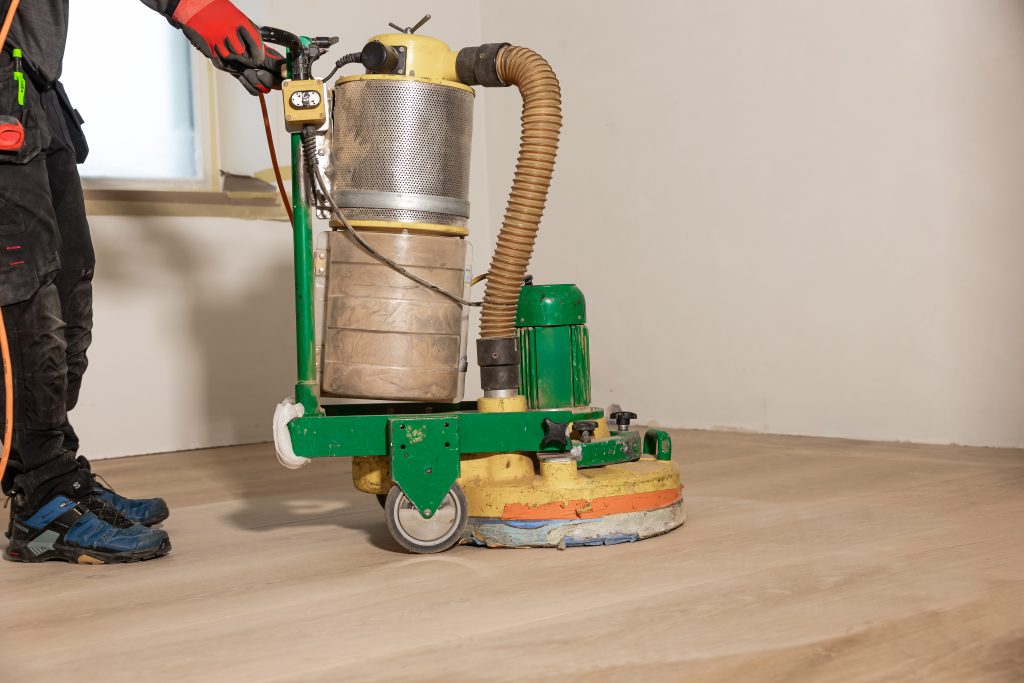
How to Polish Hardwood Floors: The DIY Guide

Hardwood floor polishing saves homeowners from unnecessary expenses. About 70% of floors that appear to need refinishing only require a good buff and a fresh protective coat. Professional sanding can run $3-8 per square foot, while buffing costs $1-2.50 per square foot professionally or under $100 for a DIY rental. This piece walks you through how to polish hardwood floors yourself, covering preparation and proper technique to restore your floor’s shine without the refinishing bill.

Understanding When Your Hardwood Floors Need Polishing

Most homeowners struggle to determine whether their floors need polishing or something more extensive. Floors with polyurethane or lacquer finishes that look flat or lack vibrancy are prime candidates for polishing. Refinishing involves sanding the entire floor and applying a new coating. This expensive process is necessary only every few decades.

Signs Your Floor Needs Attention

Your floor sends clear signals when polishing becomes necessary. A dull appearance remains the most obvious indicator. If your hardwood no longer has the same glossy finish despite regular cleaning, polishing will restore that shine. Light scratches and scuff marks also respond well to polishing, as the process fills in minor surface imperfections and restores smoothness.

High-traffic areas reveal wear patterns faster than other parts of your home. Hallways, kitchens, and living rooms show traffic marks that dull the finish without creating deep gouges. Polishing protects these zones from further damage and revives floor vitality. Water spots or moisture exposure create another scenario where polishing provides an extra protective layer against long-term damage.

You should polish every 2 to 4 months to maintain appearance and protection. High-traffic areas may require more frequent attention, while low-traffic zones need less maintenance. Avoid over-polishing, which causes product buildup and creates a hazy or sticky finish.

Difference Between Polishing, Buffing, and Waxing

Buffing serves as the safe maintenance method for refreshing your floor’s surface. A low-speed rotary buffer fitted with medium or soft pads erases micro-scratches, unifies color tone, and restores subtle sheen. This technique works best on oil, wax, or hardwax-oil finishes. These are floors designed to develop character rather than shine. Professional buffing involves spray-buffing the area once or twice with a buffing solution, followed by dry buffing without solution to remove residue and improve shine.

Polishing uses high-speed machines and ultra-fine pads to increase sheen, producing a mirror-like finish suitable for commercial spaces or event-ready properties. This process only works on lacquered or polyurethane-finished wood floors. On other surfaces, it risks streaks, patchiness, or permanent damage. Professional floor polishing involves using a high-speed burnisher to remove a layer of finish and create high gloss. For wood floors, this process is called floor screening.

Waxing applies to floors with penetrating finishes. You should clean these floors with special wax floor cleaners containing small amounts of wax. This strengthens the finish as you clean and prolongs its lifespan.

Testing Your Floor Finish Type

Confirm your floors have a urethane finish before polishing wood floors. Most wood floors feature this type. Use a sharp knife blade to scrape off a tiny bit of finish from an inconspicuous area. If you see clear material, your floors have a surface finish, making polishing safe. The finish smudges but no clear material scrapes up? Your floors have a penetrating finish. Avoid polishing and use wax instead.

A quick finger test also works: press your finger firmly against the floor. If it leaves a faint mark, buffing will refresh the surface. The finish feels hard and doesn’t smudge under pressure? Polishing becomes an option, provided you use proper materials and preparation. Always test polish in a small, hidden area before applying it to the entire floor to prevent damage.

Tools and Materials You Need to Polish Hardwood Floors

The right equipment separates successful hardwood floor polishing from disappointing results. Homeowners often purchase polish before securing proper application tools and then find their microfiber dust mop can’t handle the job. Assemble everything you need before opening a single product container.

Essential Equipment for the Job

A floor buffer or polisher is the foundation of your equipment list. These machines come with interchangeable pads suited for different floor types and allow you to switch between polishing hardwood, laminate, or tile. Motor power, pad size, and speed settings determine performance. Machines offering variable speed settings provide flexibility and let you adjust your technique based on floor conditions.

Professional operations use commercial-grade buffers with 13-inch to 15-inch pad sizes. Homeowners achieve excellent results with smaller residential models. Rental machines cost $30-60 per day from hardware stores and are available for one-time projects.

You’ll need a microfiber mop or applicator pad to distribute polish evenly. This tool makes precise application control across your floor surface possible. On top of that, acquire sandpaper or a sanding block to smooth out imperfections or scratches before polishing. This creates an even surface for the polish to adhere to.

A hard surface floor vacuum removes debris and dust particles that could scratch your floor during polishing. Standard vacuums with harsh plastic parts risk damaging hardwood, so select models designed for wood floors. A dust mop serves as backup to make final cleaning passes.

Choosing the Right Floor Polish

Polish selection hinges on your floor’s finish type. Water-based urethane polish works best for polyurethane finishes. Floors with finishes other than polyurethane require wax-based polish instead. Matt floor polish maintains natural appearance without adding unwanted gloss for extra-matt floors. High-traffic areas benefit from specialized hardwood floor high traffic polish and restorer that provides added protection and a high-gloss finish.

Products like Quick Shine Multi-Surface Floor Finish and Quick Shine Hardwood Floor Luster receive strong reviews for ease of use and effective results. Always read the label and verify compatibility with your floor type and finish. Measure your room’s square footage before purchasing, as polish labels indicate coverage area per bottle. This prevents mid-project shortages.

Test any new polish on an inconspicuous area before full application. Apply a few drops under furniture or in a closet and verify the product doesn’t damage your finish.

Safety Gear and Preparation Supplies

Protective equipment prevents injuries during wood floor polishing. Wear heavy-duty chemical-resistant gloves when handling solvents and finishes. Nitrile gloves work well for general finishing work, especially when you have flock-lined versions that absorb hand sweat. Safety glasses or goggles with side splash protection shield eyes from debris or chemical splashes. Standard safety glasses used for woodworking machinery don’t provide adequate protection when you’re doing finishing work.

Slip-resistant footwear maintains stability in potentially wet environments. Steel-toe boots add extra protection if the machine rolls over your feet. A dust mask or respirator protects against inhaling fine dust particles and chemical vapors. Use a NIOSH-approved respirator rated for wood dust when sanding. A cartridge-style respirator rated for organic vapors, mists, and paints is enough when working with solvent vapors.

Gather cleaning supplies including a few drops of dishwashing liquid or paint thinner for effective pre-polish cleaning. Ensure proper ventilation by opening windows or running fans before you start. Follow manufacturer instructions on the polish label and prevent over-application or floor damage.

Preparing Your Floor for Polishing

Proper preparation determines whether your hardwood floor polishing delivers professional results or leaves you frustrated with streaks and uneven coverage. Homeowners who rush this stage often find polish that won’t adhere or debris trapped under the finish.

Clearing and Protecting the Room

All furniture and belongings must be removed from the room before starting. Large objects should be moved with caution to avoid scratches. Furniture pads protect the floor as you slide heavy pieces out of the space. Plastic sheets work well to shield items you cannot move against dust.

Plastic sheeting and painter’s tape seal off doorways to adjacent rooms. This barrier stops dust from spreading throughout your home. Tape covers air vents and HVAC returns to stop particles from circulating through your heating and cooling system. Homes with central air systems need the HVAC turned off during preparation to avoid dust distribution through ductwork.

Deep Cleaning Before You Start

Vacuum or sweep first, then wet clean. Dust and debris act as abrasives that create micro-scratches and dull the finish when dragged across your floor with a wet mop. A vacuum with a soft brush attachment designed for hardwood floors works best. Models with beater bars scratch the surface and should be avoided. Slow vacuuming ensures deeper cleaning and prevents damage.

A microfiber pad dampened with hardwood floor cleaner mops the floor after loose particles are removed. The direction of the floorboards guides your work to avoid streaking and allows the mop to capture debris caught between planks. Wide strokes in one direction produce better results than back-and-forth motions. The floor must dry before applying polish. Moisture trapped under polish causes adhesion problems and cloudy results.

Inspecting for Damage or Repairs

Scratches, dents, gouges and loose boards need checking before polishing. Large gaps between planks, warping or buckling indicate moisture problems that need attention before you proceed. Wood filler fills minor scratches and dents. Nails or adhesive secure loose boards to stop movement. Cracks need thorough cleaning inside to remove all dirt before repairs.

Creating Proper Ventilation

Windows and doors in the room being polished should be opened to dissipate fumes and maintain healthy indoor air. Fans boost air circulation and speed drying. One window serves as your primary ventilation exit point to create consistent airflow that drives fumes outside.

Step-by-Step: How to Polish Hardwood Floors

Image Source: Central Flooring

Calculate your room’s square footage before you purchase polish. Measure the length and width in feet, then multiply these numbers together. A room measuring 10 feet by 15 feet equals 150 square feet. Include closets in your calculation by measuring their width and depth separately, then add the result to your main room total. Hardwood floors need about 30 square meters per liter of polish. One 32-ounce bottle covers 500 square feet, while a 24-ounce bottle covers 350 square feet. Homeowners often run out mid-project because they underestimate coverage needs.

Measuring Your Space and Product Needs

Add 7-15% to your total square footage to account for waste and uneven application. This buffer prevents shortages that force you to stop mid-project. Purchase enough polish for 187 square feet for a 170 square foot room with a 10% waste factor. Most projects need one coat, though heavily worn floors may need two applications.

Applying Polish with Proper Technique

Rock the polish bottle back and forth gently for 30 seconds to one minute before opening. Never shake the bottle. Shaking creates bubbles that leave marks on your floor. Pour polish onto the floor in an S-shape pattern. Dampen your microfiber applicator pad with polish, not water.

Guide the applicator pad with the wood grain using only fingertip pressure. Apply smooth, consistent strokes without pressing hard. The pad spreads the finish, and excessive pressure causes streaks and uneven coating. Let the polish do the work rather than scrubbing it into the floor. Overlap each stroke slightly to make sure you cover everything and avoid missed spots.

Working Section by Section

Divide your floor into 5-by-5-foot sections. Work one area at a time to keep control over application and prevent the polish from drying too quickly. Start in the corner furthest from your exit to avoid trapping yourself. Spread an even, consistent layer across each section. Thin applications cause poor results, so apply polish at the correct rate specified on the product’s label.

Hand-Finishing Edges and Corners

Baseboards and corners need extra care. Fold a small piece of sandpaper to create a pointed edge that reaches tight spaces where your applicator pad cannot fit. Work these areas by hand with the same grain-following technique used on open floor sections.

Drying Time and Traffic Restrictions

Polish dries in about 30 minutes per coat. You can walk on the floor wearing socks only after 1-2 hours. Wait 24 hours before you let people walk normally, return furniture, or allow pets back onto the floor. Rush this timeline and you damage the finish and create footprints in the polish.

Maintaining Your Polished Floors and Avoiding Common Mistakes

Polish buildup ruins more floors than homeowners realize. Too much product or reapplying too frequently creates thick urethane layers that trap dirt and cause cloudy, uneven patches. Poor technique leaves streaks and blotchy areas that peel or crack over time.

Mistakes That Ruin Your Results

Thin polish application produces streaks as finish levels vary on the floor. Moisture gets trapped and causes hazing when you don’t allow proper dry time between coats. You embed dust particles into the finish when you start without a clean floor. Never use ammonia, bleach, oil soaps, or wax-based products, as these dull or damage the finish. Excess water causes warping and structural damage over the long term.

Long-Term Care and Cleaning Schedule

Sweep or dust mop daily to prevent scratches. Vacuum weekly using the bare floor setting without beater bars. Deep clean monthly with pH-neutral hardwood cleaner suitable to your finish type. Address spills right away with a dry or slightly damp cloth.

When to Reapply Polish

Polish every 2 to 4 months depending on traffic. High-traffic homes need attention closer to the two-month mark. Apply a maintenance coat every three to seven years to restore protection without full refinishing.

When to Call a Professional Instead

Deep scratches through the finish and water damage causing cupping or warping just need professional refinishing rather than polishing. Soft spots, loose boards, or extensive discoloration also just need expert assessment.

Conclusion

You now have everything you need to restore your hardwood floors without spending thousands on professional refinishing. The process boils down to proper preparation and correct product selection.

Test your finish type first, gather the right tools, and work section by section. Polish every 2 to 4 months to maintain protection and shine. Avoid over-application and respect drying times—these two mistakes ruin more floors than anything else.

Your floors will look professionally refinished for a fraction of the cost. Keep up with regular maintenance, and you’ll extend their life for years to come.

FAQs

Q1. How can I restore shine to dull hardwood floors? To restore shine to dull hardwood floors, start by thoroughly cleaning the surface to remove all dirt and debris. Then apply a quality hardwood floor polish using a microfiber applicator pad, working in the direction of the wood grain. Use smooth, consistent strokes with light pressure and allow proper drying time of 24 hours before resuming normal traffic. This process fills in minor scratches and creates a protective layer that brings back the floor’s natural luster.

Q2. What is the best product to use for polishing hardwood floors? The best polish depends on your floor’s finish type. For polyurethane-finished floors, use water-based urethane polish. Weiman Hardwood Floor Polish & Restorer is an excellent option as it uses micro-filling technology to remove scratches while creating a protective, scratch-resistant layer that leaves a brilliant, natural sheen without sticky residue. Always test any product in an inconspicuous area first to ensure compatibility with your specific floor finish.

Q3. Is Murphy’s Oil Soap safe for hardwood floors? Murphy’s Oil Soap and other oil-based soaps should be avoided on hardwood floors as they can dull or damage the finish over time. Instead, use pH-neutral hardwood floor cleaners specifically designed for your finish type. For daily maintenance, sweep or dust mop, and for deeper cleaning, use a microfiber mop dampened with appropriate hardwood floor cleaner, working in the direction of the floorboards.

Q4. How often should I polish my hardwood floors? Polish your hardwood floors every 2 to 4 months to maintain their appearance and protection. High-traffic areas like hallways, kitchens, and living rooms may require attention closer to the two-month mark, while low-traffic zones need less frequent polishing. Avoid over-polishing, as this causes product buildup that creates a hazy or sticky finish.

Q5. What hardwood floor colors are trending in 2026? While floor color trends evolve, the focus in 2026 is on maintaining and protecting existing hardwood floors rather than replacement. Proper polishing and maintenance can restore the natural beauty of your current floors regardless of color, saving thousands compared to refinishing or replacement. Regular care every 2-4 months keeps floors looking fresh and extends their lifespan for years to come.

📬 Subscribe to DecorModern newsletter

We don’t spam! Read more in our privacy policy

Scroll to Top